Why Replacing Your Garage Door’s Bottom Rubber Seal Matters
Replace rubber on bottom of garage door is a common maintenance task that protects your home from weather, pests, and energy loss. Here’s what you need to know:
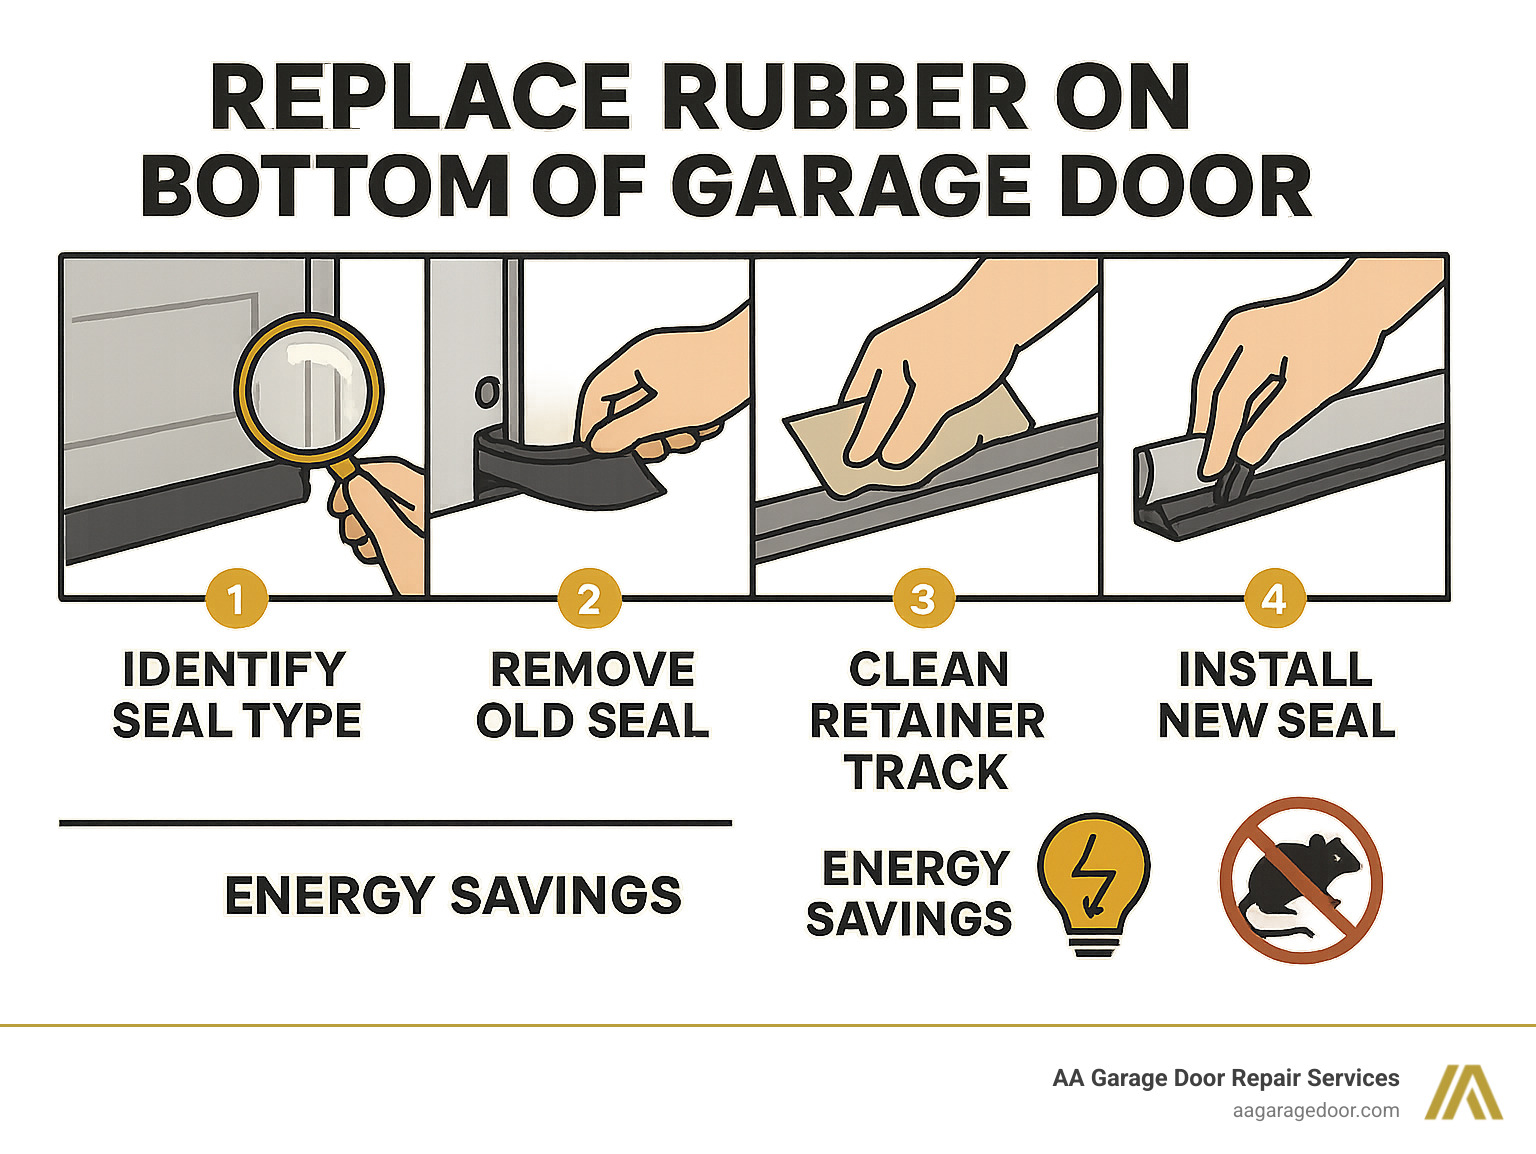
Quick Steps to Replace Your Garage Door Bottom Seal:
- Identify your seal type – T-Type, J-Type, Bulb, or Beaded
- Measure the old seal – Width and T-end dimensions
- Remove the old seal – Slide out from the retainer track
- Clean the retainer – Remove debris and lubricate
- Install new seal – Slide in and trim excess
- Test the fit – Check for gaps when door is closed
One of the most common garage door problems is a worn-out bottom seal. As research shows, these seals can get cracked, tear, or fall apart over time. When that happens, cold air, dust, water, and even pests like rats can enter your garage.
A properly functioning bottom seal keeps your garage comfortable, protects stored items from moisture, and can significantly reduce energy costs. The good news is that replacing most garage door bottom seals is a straightforward DIY project that takes about an hour. Keeping your entire system in top condition is key to a secure and efficient home.
I’m David Sands, owner of AA Garage Door LLC with over 23 years of experience helping Twin Cities homeowners replace rubber on bottom of garage door seals and maintain their garage door systems. Throughout my career, I’ve seen how a simple seal replacement can solve multiple problems and save homeowners hundreds in energy costs.
Why a New Garage Door Seal is a Smart Home Upgrade
Picture this: it’s a frigid February morning in Minnesota, and you step into your garage expecting the usual arctic blast. Instead, you’re pleasantly surprised by a space that actually feels comfortable. That’s the magic of a properly functioning garage door bottom seal – and unfortunately, it’s something most homeowners only notice when it’s gone.
Your garage door’s bottom seal works hard every single day. It gets cracked from temperature swings, torn from constant friction, and eventually starts falling apart after years of faithful service. When that happens, you’ll start noticing some unwelcome changes around your garage.
Cold air becomes your garage’s most persistent visitor, sneaking in through every gap and crack. If your garage connects to your home, this translates directly into higher heating bills as your furnace works overtime to compensate. Meanwhile, dust and debris make themselves at home, coating everything in a fine layer of grime that seems impossible to keep up with.
Water intrusion is another common problem with failing seals. That innocent-looking puddle after a rainstorm can damage stored belongings, create slip hazards, and even lead to mold growth in humid conditions. And let’s not forget about pest entry – mice, insects, and other unwelcome creatures view that gap under your door as a VIP entrance to their new winter home.
When you replace rubber on bottom of garage door seals, you’re making a smart investment in your home’s energy efficiency. A proper seal creates that crucial barrier between your garage and the outside world, which can lead to noticeably lower heating bills during those brutal Minnesota winters.
Beyond the energy savings, you’re also protecting your garage contents from moisture, extreme temperatures, and dust. Your tools stay rust-free, your stored items remain in better condition, and your vehicles are shielded from the elements. There’s even an improved curb appeal factor – a fresh, intact seal shows that you take pride in maintaining your home.
The best part? This upgrade typically costs less than $50 and can be completed in about an hour. It’s one of those rare home improvements that delivers immediate, noticeable results while paying for itself through energy savings over time.
Identifying Your Garage Door’s Bottom Seal
Think of this step as being a garage door detective – and trust me, it’s easier than it sounds! Before you can replace rubber on bottom of garage door, you need to know exactly what type of seal you’re working with. I’ve seen too many frustrated homeowners trying to force the wrong seal into their door, and it never ends well.
Most garage doors use a seal that slides into a metal track (called a retainer) at the bottom edge of the door. Here’s the thing – these seals are definitely not one-size-fits-all. Each type has its own personality, if you will, and knowing which one you have is absolutely crucial for getting the right replacement.
The Four Common Seal Types
In my 23 years of experience, I’ve encountered four main types of garage door bottom seals, each with its own unique design:
The T-Type seal is by far the most common type I see in the Twin Cities area. It gets its name from the two “T” shaped ends that slide neatly into parallel channels within the retainer. What I love about T-Type seals is that they’re generally the most straightforward to install and provide an excellent seal against the elements.
The J-Type seal is similar to its T-shaped cousin, but instead of two T-ends, it features a single “J” shaped flange that slides into one channel. It’s a solid choice that works well for many door types.
The Bulb seal has a distinctive circular or “bulb” shape at its base. This design is brilliant because it compresses to fill gaps effectively. You’ll typically find these sliding into a single, wider channel retainer.
Finally, there’s the Beaded seal, which has a small, round bead at the top that fits into a specialized channel. I see these more often on older garage doors or specific manufacturer models.
The retainer itself comes in two main varieties: single channel retainers (perfect for J-Type or Bulb seals) and double channel retainers (typically used with T-Type seals).
When measuring, you’ll need to consider the seal width – that’s the overall width of the rubber part extending from the retainer to the ground. Common widths are 3 or 4 inches, though wider seals are available for uneven concrete surfaces. For T-Type seals, the T-end size (usually 1/4 inch or 5/16 inch) is critical for a smooth fit.
How to Identify Your Seal
Here’s my foolproof method for identifying your garage door’s bottom seal:
Start by cutting a small piece – just 2-3 inches from your existing seal. Choose a section that still holds its original shape as much as possible. This little sample will be your best friend during the identification process.
Next, examine the cross-section by looking closely at the cut end. This reveals the seal’s true profile – whether it’s a T, J, bulb, or bead shape. Match it to the seal types I described above by comparing your sample to reference images.
Measure the width when flat by laying your sample piece flat and measuring its total width. This is the part that will compress against your garage floor. Don’t forget to note your retainer channel type – take a look at that metal track at the bottom of your door. One channel or two? This confirms whether you need a single-channel or double-channel compatible seal.
If you’ve identified a T-Type seal, measure the T-end size carefully. The width of those “T” shaped ends needs to match your retainer’s grooves perfectly.
For reference, here’s what a typical T-Type seal looks like: Example of a T-Type Seal. Once you’ve completed this identification process, you’ll be ready to purchase the perfect replacement seal and move forward with confidence.
How to Replace the Rubber on the Bottom of Your Garage Door (T-Type)
Now for the main event! The T-Type seal is widely considered the easiest for a DIY replacement, and that’s what we’ll focus on here. While the exact steps might vary slightly for other slide-in seals (J-Type, Bulb, Beaded), the core principles of removal, preparation, and installation remain similar. We’re confident you can tackle this project and achieve a great result.
Step 1: Gather Your Tools and Prepare the Door
Before we get started, let’s make sure we have everything we need. A little preparation goes a long way in making this process smooth and efficient.
Tools and Materials You’ll Need:
- New Bottom Seal: Ensure it’s the correct type and length for your garage door. Remember to measure the full width of your garage door (e.g., 8-10 feet for single-car, 16-18 feet for two-car) and consider ordering your new seal 5-6 inches longer than needed. This extra length can be tucked back for a tighter fit and to account for any shrinkage over time.
- Utility Knife or Heavy-Duty Scissors: For cutting the old and new seals.
- Pliers: Especially needle-nose or channel-lock pliers, for uncrimping and re-crimping the retainer ends.
- Flathead Screwdriver: Useful for prying, cleaning, and potentially straightening bent retainer sections.
- Silicone-Based Lubricant or Soapy Water: Absolutely essential for helping the new seal slide into the retainer channels. Do not use oil-based lubricants, as they can degrade rubber.
- Cleaning Rags: For cleaning the retainer.
- Safety Glasses: Always protect your eyes when working.
- Work Gloves: To protect your hands from grime and potential sharp edges.
- A Willing Assistant (Optional but Recommended): While possible alone, having a second person makes feeding the new seal much easier, especially on wider doors.
Safety First! Prepare Your Door:
- Unplug the Garage Door Opener: This is paramount for safety. We want to ensure the door cannot accidentally move while you’re working on it. Just pull the plug from the ceiling outlet.
- Raise the Door to a Comfortable Height: Open your garage door about 3/4 of the way up, or to eye level. This gives you easy access to the bottom edge. If you don’t have an automatic opener, block the roller at the track so the door stays where you want it.
- Secure the Door (Optional but Recommended): If your door has manual locks or can be secured with C-clamps or vise grips on the vertical track, do so. This adds an extra layer of safety, preventing the door from falling or moving unexpectedly.
Step 2: Remove the Old Seal and Clean the Retainer
Out with the old, in with the new! This step can be a bit messy, but it’s crucial for a successful replacement.
- Undo the Ends of the Old Seal: At each end of the metal retainer, you’ll often find that the channels are slightly crimped or pinched. This is what keeps the seal from sliding out. Use your pliers to gently un-crimp or flatten these ends. If your old seal was secured with screws, remove those first with a screwdriver.
- Slide the Old Seal Out: This is where an assistant comes in handy. Have one person gently pull the old seal from one end while the other person helps guide it. If it’s stubborn or brittle, you might need to cut it into smaller, more manageable pieces with your utility knife to pull it out section by section. Don’t be afraid to give it a good tug!
- Clean the Retainer Track: Once the old seal is completely removed, take your cleaning rags and flathead screwdriver to thoroughly clean out the aluminum retainer channel. Remove any accumulated dirt, dust, old adhesive residue, or debris. A clean track ensures the new seal slides smoothly and sits properly.
- Check for Bent Sections: While cleaning, inspect the retainer for any bent or damaged sections. Use your pliers or flathead screwdriver to carefully straighten any kinks or crimps. A smooth, straight retainer is key for easy installation and a tight new seal.
Step 3: Install the New Seal to replace rubber on bottom of garage door
This is where your garage door gets its fresh new look and improved protection. This is also the main part of how we replace rubber on bottom of garage door.
- Lubricate the Retainer Channels: This is a game-changer! Spray a generous amount of silicone-based lubricant into both channels of the retainer along the entire length of the door. Alternatively, you can dip the new seal in warm, soapy water. This dramatically reduces friction and makes sliding the new seal much, much easier.
- Fold the New Seal in Half: Take your new seal and fold it lengthwise into a “U” or “C” shape, so that the “T” ends (or appropriate flanges for other types) are aligned and ready to be inserted.
- Insert into One Side of the Track: Starting from one end of the door, gently feed both “T” ends of the folded new seal into the corresponding channels of the retainer. Get about 6-12 inches of the seal into the track.
- Feed the Seal Across the Door: Now, this is where the assistant truly shines. One person can continue to feed the seal into the retainer from one end, while the other person gently pulls the seal from the opposite end. Keep the seal folded in that “U” shape as you slide it. Go slowly and steadily. If it snags, stop, adjust, and re-lubricate. It’s often compared to threading a giant needle!
- Trim Excess Seal: Once the new seal is fully inserted and centered on the door, you’ll likely have some excess material. We recommend leaving about 1/2 inch to 1 inch of extra seal hanging out from each end of the retainer. This allows for any slight adjustments or shrinkage over time. Use your utility knife or heavy-duty scissors to trim the excess.
- Tuck Extra into the End: Take the 1/2 to 1 inch of excess seal at each end and gently fold it back onto itself, then tuck it into the end of the retainer. This creates a neat, finished look and helps prevent the seal from sliding out.
- Crimp Retainer Ends with Pliers: Use your pliers to gently re-crimp or pinch the ends of the metal retainer channels. This secures the new seal in place and prevents it from ever sliding out accidentally.
And just like that, you’ve completed the main part of the process to replace rubber on bottom of garage door!
Pro Tips for a Perfect, Long-Lasting Seal
You’ve made it through the installation – congratulations! But before you celebrate, let’s make sure your hard work pays off for years to come. Even with a straightforward process like learning how to replace rubber on bottom of garage door, little challenges can pop up. Don’t worry though – I’ve been helping homeowners with these exact issues for over two decades, and these pro tips will help you overcome common hiccups and ensure your new seal performs like a champ, especially during our brutal Minnesota winters.
Troubleshooting Common Replacement Problems
The most frustrating moment in any seal replacement? When that new seal simply won’t slide into the track. Trust me, I’ve gotten plenty of calls from DIY-ers ready to throw in the towel at this exact point. The solution is almost always the same: lubricate, lubricate, lubricate! I can’t stress this enough – use more silicone spray or soapy water than you think you need. Make sure you’re getting that lubricant inside the channels, not just on the surface.
Sometimes the culprit is a bent retainer track that you missed during your initial cleaning. Run your finger along the inside of both channels – they should feel smooth and straight. If you find any crimps, bends, or rough spots, use your flathead screwdriver or pliers to carefully straighten them out. Even a small kink can make installation nearly impossible.
Another common headache is finding you have the wrong seal size after you’ve already started. You measured carefully, but the seal feels either too loose or impossibly tight. Here’s the thing – different garage door manufacturers use varying standard sizes for their retainer channels, so seals aren’t always universally interchangeable. Double-check those measurements, especially the “T” end dimensions for T-Type seals. When in doubt, bringing your small sample piece to the hardware store can save you a second trip.
How to Ensure a Tight Fit After You replace rubber on bottom of garage door
Installing the seal is only half the battle – now we need to make sure it’s actually doing its job. Once your new seal is in place, lower your garage door completely and head inside. Turn off all the garage lights and look for any slivers of light sneaking in under the door. Even tiny gaps mean your seal isn’t making complete contact with the ground.
If you’re dealing with uneven pavement – and let’s be honest, most of us are – you might still see some gaps despite a perfectly installed seal. This is where a wider seal (sometimes 2 inches or more) becomes your best friend. These wider seals have more rubber material to spread out and conform to those dips and bumps in your concrete, creating a much better barrier.
Here’s a testing tip that many DIY-ers skip: reconnect your garage door opener and run the door up and down several times. Watch how the seal behaves as the door closes. If your opener suddenly starts reversing when the door tries to close, it might be detecting the new, thicker seal as an obstruction. You may need to adjust the close travel limits on your opener – check your manual for specific instructions, or give us a call if you’re not comfortable making those adjustments.
Choosing the Right Seal Material for Your Climate
Living in Minnesota and Wisconsin means your garage door seal faces some serious weather challenges. Those standard rubber seals you’ll find at most big box stores? They work fine in moderate climates, but our extreme temperature swings can make them crack, harden, or lose flexibility faster than you’d expect.
For our harsh winters, silicone or vinyl seals are absolute game-changers. These materials maintain their flexibility even when temperatures drop well below zero, and they resist the cracking that comes from repeated freeze-thaw cycles. Yes, they cost a bit more upfront, but they’ll last significantly longer – meaning you won’t need to replace rubber on bottom of garage door seals nearly as often.
I’ve seen too many homeowners install a new rubber seal in October, only to find it cracked and brittle by March. Investing in a cold-weather seal from the start saves you time, money, and the frustration of dealing with a failed seal during the worst weather of the year. Your garage – and your heating bill – will thank you for making the smart choice.
When to Skip the DIY and Call a Professional
I’m all for empowering homeowners to tackle their own projects – there’s nothing quite like the satisfaction of fixing something yourself! But after 23 years in the garage door business, I’ve learned that sometimes the smartest move is knowing when to step back and call in the professionals. While replacing a simple T-type seal is absolutely a great DIY project, certain situations can turn what should be a straightforward task into a frustrating, time-consuming, or even unsafe ordeal.
Signs You Need Professional Help
The biggest red flag is a damaged or rusted retainer. If that metal track at the bottom of your door is severely corroded, bent beyond simple straightening, or falling apart, you’re looking at a complete retainer replacement. This often means drilling out rivets, removing the old track entirely, and installing a new one – definitely not a weekend warrior project.
Another situation that calls for professional help is when you find your garage door’s bottom panel is warped. No matter how perfect your new seal is, it can’t compensate for a door that’s twisted, rotted (especially common with older wood doors), or severely damaged. The door itself needs attention before any seal replacement will be effective.
Complex seal types can also throw a wrench in your DIY plans. While T-type seals are straightforward, some older doors or custom installations use unique sealing systems that don’t fit the standard categories we’ve discussed. These might require specialized tools, unusual installation techniques, or replacement parts that aren’t readily available at your local home improvement store.
Sometimes the issue isn’t complexity – it’s confidence. If you’re unsure about measurements or identification after following our guide, it’s worth getting professional input. Buying the wrong seal and having to start over isn’t just frustrating; it’s expensive.
Let’s be honest about time and physical limitations too. Maybe you’ve got the skills but not the time, or perhaps crawling around on the garage floor isn’t as easy as it used to be. There’s no shame in recognizing when a professional can handle the job more efficiently.
Most importantly, if you ever feel uncomfortable about safety concerns, trust that instinct. Garage doors are heavy, operate under significant spring tension, and can cause serious injury if something goes wrong. Your safety is worth more than the cost of a service call.
If you’re in the Twin Cities area and encounter any of these situations, professional help is just a phone call away. Our experienced technicians have the specialized tools and knowledge to tackle even the trickiest seal problems, ensuring you get a perfect, lasting result without the headaches.
A Sealed Garage is a Protected Garage
There’s something deeply satisfying about stepping back and admiring a job well done. When you replace rubber on bottom of garage door seals, you’re not just fixing a problem – you’re making a smart investment in your home’s comfort, security, and efficiency. This simple maintenance task delivers impressive results that you’ll notice immediately and appreciate for years to come.
The benefits extend far beyond just stopping those annoying drafts. Your energy bills will thank you as your heating and cooling systems work less hard to maintain comfortable temperatures. Your stored belongings – from holiday decorations to power tools – stay dry and protected from moisture damage. And perhaps most importantly, you’ve created a barrier that keeps unwanted visitors like insects, rodents, and other pests from treating your garage like their personal highway.
Throughout my 23 years serving homeowners in the Twin Cities, St. Paul, and Western Wisconsin, I’ve seen how this one simple repair can transform a garage from a problem area into a truly functional space. The peace of mind that comes with knowing your garage is properly sealed is worth every minute of effort you put into the project.
Of course, not every seal replacement goes according to plan. Sometimes you’ll find that rusted retainer that’s seen better days, or realize your door bottom has warped more than expected. Maybe you’re simply more comfortable having an expert handle the job from start to finish – and that’s perfectly okay!
When DIY isn’t the right fit, the team at AA Garage Door Repair Services is ready to step in with fast, reliable, and professional garage door services that ensure your door is perfectly sealed. We’ve been helping local homeowners solve these exact challenges since 2001.
Ready to say goodbye to those frustrating gaps and hello to a properly protected garage? Contact us today for a quote. Your garage – and your energy bills – will thank you!

