Why Understanding Garage Door Cables Installation is Critical for Home Safety
Garage door cables installation is a crucial repair that every homeowner should understand, even if they ultimately hire a professional. When you notice a slack cable or your door refuses to open, it’s a clear sign of a problem that needs immediate attention. For your safety, know the correct procedures or to call for reliable garage door services from a trusted local company.
Quick Answer: Essential Steps for Garage Door Cables Installation
- Disconnect power to the garage door opener.
- Secure the door in the open position with C-clamps.
- Release spring tension using proper winding bars (torsion systems only).
- Remove the old cable from the drum and bottom bracket.
- Install the new cable, ensuring proper routing and tension.
- Re-tension the springs and perform balance tests.
- Reconnect power and test the door’s operation.
Garage door cables work with the spring system to counterbalance the door’s weight, which can be 150-400 pounds. These cables are under extreme tension and are a critical safety feature. While a DIY installation can save on the professional cost of $150-$400, it carries significant safety risks. I’m David Sands, owner of AA Garage Door LLC, and with over 23 years of experience, my team and I have guided countless homeowners through safe repair procedures, always emphasizing the critical safety considerations involved.

Understanding Your Garage Door’s Cable and Spring System
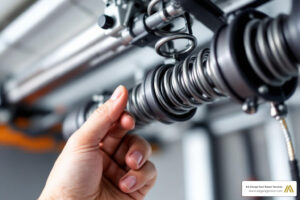
Your garage door relies on springs and cables working together to lift a door that can weigh 150–400 pounds. Cables are the crucial link that lift the door, act as a safety backstop, and keep the system counterbalanced.
Your door will use one of two spring systems:
- Torsion spring systems: One or more springs on a shaft above the door. Cables run from the door’s bottom corners up to cable drums on the shaft, winding/unwinding as the door moves.
- Extension spring systems: Springs run along the horizontal tracks. Cables route from the door bottom, through pulleys, and attach to the springs.
The cables for these systems are not interchangeable—using the wrong type is unsafe.
Signs Your Garage Door Cables Need Attention
- Fraying wires or kinks
- Rust/corrosion
- Snapped cable or slack/tangled cable
- Crooked/jammed door
- Grinding/screeching noises
If you see physical damage (fraying or rust), replacement—not adjustment—is the only safe option.
The Dangers of DIY Cable Repair
Springs and cables are under high tension. A sudden release can cause severe injury or allow the door to fall. NEISS reports thousands of garage door–related injuries every year, many from DIY attempts. When in doubt, prioritize safety and call a professional.
Preparing for Garage Door Cables Installation
Proper preparation is the key to a safe and successful garage door cables installation. Think of it as preparing for surgery—you need the right tools and a sterile, safe environment. Safety isn’t just a phrase; it’s your lifeline.

Tools and Materials
Using the right tools is not optional; it’s critical.
- Winding Bars (for torsion springs): These are non-negotiable. Never substitute them with screwdrivers or other objects.
- C-clamps or Locking Pliers: To secure the door in place and prevent it from falling.
- Socket Wrench Set and Adjustable Wrench: For loosening and tightening nuts and bolts.
- Sturdy Ladder: To safely reach components near the ceiling.
- Safety Glasses and Leather Work Gloves: Your first line of defense against injury.
- Replacement Cables: Ensure you have the correct cables for your door’s size and spring system. Always replace both cables at the same time for balanced operation.
Crucial Safety Precautions to Take
These steps are non-negotiable requirements for your safety.
- Disconnect Power: Unplug the garage door opener from the electrical outlet. Pull the emergency release cord to disconnect the door from the opener mechanism.
- Secure the Door: With the door fully open, clamp C-clamps onto the vertical tracks on both sides, just below the bottom rollers. This prevents the door from crashing down.
- Never Touch Components Under Tension: Springs and cables store immense energy. Do not handle them unless you have released the tension correctly.
- Work with a Helper: An extra set of hands and eyes can prevent accidents, especially with torsion springs.
- Wear Protective Gear: Safety glasses and leather gloves are essential.
- Clear the Workspace: Keep children, pets, and obstacles away from the work area.
How to Replace Cables on a Torsion Spring System
Torsion spring systems are powerful and efficient, but they demand extreme caution. The springs store enormous energy, and the cables connect the door’s bottom corners to winding drums on the torsion tube above the door. This is a repair where many homeowners should seriously consider calling a professional due to the high risks involved.

Step-by-Step Garage Door Cables Installation for Torsion Springs
If you are confident and have the right tools, follow these steps precisely.
- Open and Secure the Door: Manually lift the door to the fully open position and secure it to the vertical tracks with C-clamps. If the door is stuck closed, the process is more complex and dangerous.
- Release Spring Tension: This is the most critical step. Using proper winding bars, carefully unwind the spring a quarter-turn at a time. Keep your body clear of the bars’ path, as they can whip around violently if you lose control. Continue until all tension is gone.
- Loosen the Cable Drums: With the spring safely unwound, loosen the set screws on the cable drums at each end of the torsion tube.
- Remove the Old Cable: Detach the cable from the bottom bracket on the door, then unwind it from the drum.
- Install the New Cable: Attach the looped end of the new cable to the anchor pin on the bottom bracket. Thread the other end toward the cable drum.
- Wind the Cable onto the Drum: The cable must sit neatly in the drum’s grooves without overlapping. Wind it tightly and evenly, then secure the set screws on the drum.
- Re-tension the Spring: This is just as dangerous as releasing the tension. Using your winding bars, carefully wind the spring back to its required number of turns (typically 7-10 full turns for a 7-foot door). Maintain full control at all times.
- Final Checks: Remove all clamps and tools. Manually test the door for smooth, balanced movement before reconnecting the opener.
How to Replace Cables on an Extension Spring System
Extension spring systems are often more accessible than torsion systems, but they still store significant energy and require caution. In this setup, cables run from the door’s bottom corners, up through pulleys, and connect to springs that run parallel to the horizontal tracks. A key feature is the safety cable, which is designed to contain a spring if it breaks, preventing it from becoming a dangerous projectile.

Step-by-Step Garage Door Cables Installation for Extension Springs
Follow these steps for a safe and successful installation.
- Open and Secure the Door: Manually lift the door all the way up and lock it in place with C-clamps on both vertical tracks, just below the bottom rollers. Disconnect the garage door opener.
- Detach the Old Cable: Carefully detach the old cable from the bottom bracket on the door and then from the pulley system.
- Inspect the Pulleys: This is the perfect time to check pulleys for wear or damage. A bad pulley can ruin a new cable, so replace them if they look worn.
- Install the New Lifting Cable: Attach the new cable’s looped end to the bottom bracket’s anchor pin. Thread it through the pulley system, following the exact path of the old cable. A helpful visual can be found in this guide on cable replacement.
- Adjust Tension: The cables should be taut but not overly tight. Adjust the connection point to achieve a perfect balance where the door moves smoothly without slack in the cables.
How to Properly Install a Safety Cable
Safety cables are a non-negotiable part of any extension spring system.
- Thread the Cable: Run the safety cable directly through the center of the extension spring.
- Secure Both Ends: Attach one end to the track bracket or frame near the front of the track and the other end to the bracket or frame at the rear.
- Check for Interference: The safety cable should be taut enough to contain a broken spring but loose enough that it doesn’t interfere with normal spring movement.
After the Installation: Testing and Maintenance
Completing the garage door cables installation is a big step—now confirm safe operation and protect your investment with simple upkeep.

How to Test for Proper Balance
- Disconnect the opener with the door closed.
- Manually lift the door to about halfway.
- A balanced door should stay put. If it drops, springs need more tension; if it rises, there’s too much. Adjustments to torsion springs should be done with extreme caution or by a pro.
- Reconnect the opener only after the door is properly balanced.
Maintenance and Inspection Schedule
- Inspect cables every 3–6 months for fraying, rust, or slack.
- Lightly lubricate cables, pulleys, and springs with a silicone-based spray (never grease). Wipe excess.
- Keep hardware tight and the tracks clean. An annual professional inspection is wise for safety and longevity.
DIY vs. Professional Installation: Making the Right Choice
When a cable fails, ask not just “Can I fix it?” but “Should I?” Cables and springs are under extreme tension, and mistakes can be costly—both financially and physically.
- Cost: DIY parts may be $50–$100 (plus tools like winding bars). Professional service typically runs $150–$400 and includes expertise, proper tools, and warranty.
- Time: Pros often finish in 1–2 hours. DIY can take a full day or weekend if you’re learning on the fly.
- Safety & skill: Professionals are trained to manage high-tension components safely.
Why Hiring a Professional is Often the Safest Option
Pros bring training, specialized tools, safety protocols, and warranty-backed workmanship. If you’re in the Twin Cities area and want it done right the first time, schedule expert garage door cable repair.
Frequently Asked Questions about Garage Door Cable Installation
After more than two decades in the business, we’ve heard every question about garage door cables installation. Here are answers to the most common concerns we hear from homeowners in the Twin Cities area.
How long do garage door cables last?
Typically, you can expect garage door cables to last between 5 and 7 years with normal use. However, several factors can affect this lifespan. High usage frequency, exposure to moisture and extreme temperatures like those in Minnesota, and a lack of maintenance can cause cables to wear out faster. An unbalanced door also puts extra stress on cables, potentially cutting their lifespan in half.
Can I replace just one broken cable?
We strongly recommend against replacing just one cable. Always replace garage door cables in pairs. A new cable has different strength and stretch characteristics than the remaining old one, creating an imbalanced system. This uneven tension can cause the door to operate poorly and puts the older cable at high risk of failing soon after, leading to another repair call. Replacing both at once ensures proper balance and safer, smoother operation.
What is the average cost to have garage door cables replaced?
Professional garage door cable replacement typically costs between $150 and $400. The final price depends on your location, the type of spring system (torsion systems are often more complex), and whether other components like pulleys or springs also need attention. This cost covers not just the parts but also the technician’s expertise, specialized tools, safety protocols, and warranty protection. We always provide free estimates with transparent pricing, so you know the cost before any work begins.
Secure Your Home with a Flawlessly Operating Garage Door
Your garage door is central to safety and convenience. Proper garage door cables installation helps your door run smoothly, protects your opener and springs, and prevents emergencies.
At AA Garage Door Repair Services, we’ve served Twin Cities, MN, and Western WI homeowners since 2001 with fast, reliable, 24/7 service and transparent pricing. We work across St. Paul, Minneapolis, Woodbury, Maple Grove, Eden Prairie, Plymouth, Eagan, Apple Valley, Hudson WI, Baldwin WI, Stillwater, Prior Lake, Brooklyn Park, Burnsville, and more.
Whether you need urgent help after a cable snap or want preventive maintenance, our local team has you covered. Get a free estimate and restore safe operation today.
How to Replace Cables on a Torsion Spring System
Torsion systems are efficient but dangerous to service because of stored spring energy. If you proceed, do so with proper tools and extreme caution.
Step-by-Step Garage Door Cables Installation for Torsion Springs
- Open and secure the door fully with C-clamps just below the bottom rollers, and disconnect power to the opener.
- Release spring tension using only winding bars, a quarter-turn at a time, keeping a firm grip and clear body position.
- Loosen the cable drum set screws on both ends of the torsion tube.
- Remove the old cable from the bottom bracket and unwind it from the drum.
- Attach the new cable to the bottom bracket anchor pin and route it to the drum.
- Wind the cable neatly into the drum grooves; tighten the set screws.
- Re-tension the spring using winding bars to the manufacturer-specified number of turns for your door height. If unsure, stop and call a pro.
- Remove clamps, test for smooth balance manually, then reconnect the opener.
How to Replace Cables on an Extension Spring System
Extension systems are generally more accessible than torsion setups but still store significant energy. Work methodically and keep safety first.
Step-by-Step Garage Door Cables Installation for Extension Springs
- Open and secure the door with C-clamps on both tracks; disconnect the opener.
- Detach the old cable from the bottom bracket and pulley system.
- Inspect pulleys; replace any that are worn or damaged.
- Install the new lifting cable: attach to the bottom bracket, route through the pulleys, and secure—match the original path. A helpful visual can be found in this guide on cable replacement.
- Adjust tension so cables are taut (not overly tight) and the door moves smoothly.
How to Properly Install a Safety Cable
- Thread the safety cable through the center of each extension spring.
- Secure both ends to sturdy brackets at the front and rear of the track.
- Ensure it contains a break without interfering with normal spring movement.
After the Installation: Testing and Maintenance
You’ve finished the garage door cables installation—now verify balance and set a simple care routine to avoid premature wear.
How to Test for Proper Balance
- Disconnect the opener, lift the door halfway, and see if it stays. Falling = not enough spring tension; rising = too much. For torsion systems, adjustments are best left to a pro.
- Reconnect the opener after the door is balanced.
Maintenance and Inspection Schedule
- Every 3–6 months, check cables for fraying, rust, kinks, or slack.
- Lightly apply silicone-based lubricant to cables, pulleys, and springs; wipe excess.
- Consider annual professional inspection for safety and longer component life.
DIY vs. Professional Installation: Making the Right Choice
DIY can cut upfront costs but demands time, proper tools, and high confidence working around high-tension parts. Professionals bring training, speed, and warranty support.
- DIY: Lower parts cost but higher risk; expect significant time investment.
- Pro: Typical total $150–$400, completed in 1–2 hours with correct tools and safety protocols.
Why Hiring a Professional is Often the Safest Option
Trained technicians follow strict procedures, catch hidden issues, and stand behind their work. When safety and reliability matter, hiring a pro is the best value.
Understanding Your Garage Door’s Cable and Spring System
Think of your garage door as a 150–400 lb wall that springs and cables lift in sync. Cables do three jobs: lift the door, serve as a safety link, and keep the system balanced.
- Torsion springs mount above the door; cables wind on drums at each end of the torsion tube.
- Extension springs run along the horizontal tracks; cables route through pulleys to the springs.
Cables aren’t interchangeable between systems. If you notice fraying, rust, slack, or a crooked door, address it immediately—damaged cables must be replaced, not adjusted. Because springs store tremendous energy, DIY work carries real injury risk. When uncertain, choose professional service.
Preparing for Garage Door Cables Installation
Preparation is your safety net. Have the right tools ready and clear the work area before you start.
Tools and Materials:
- Winding bars (torsion systems only), C-clamps/locking pliers
- Socket wrench set, adjustable wrench, sturdy ladder
- Safety glasses, leather work gloves, cable cutter (optional)
- Correct replacement cables for your door and spring system (replace both sides together)
Crucial Safety Precautions to Take
- Unplug the opener and pull the emergency release.
- Secure the open door with C-clamps on both tracks (or keep closed if a cable snapped closed).
- Never touch springs/cables under tension unless you’re properly releasing/setting tension.
- Work with a helper and wear eye/hand protection.
- Keep kids, pets, and clutter away from the work zone.
How to Replace Cables on a Torsion Spring System
Torsion systems require exact tools and technique. If you’re not fully confident, hire a pro.
Step-by-Step Garage Door Cables Installation for Torsion Springs
- Open and secure the door; disconnect power.
- Using winding bars, carefully release spring tension a quarter-turn at a time.
- Loosen drum set screws; remove the old cable.
- Attach and route the new cable; wind it neatly onto the drum and tighten set screws.
- Re-tension the spring to the manufacturer’s specification for your door height.
- Remove clamps, test balance manually, then reconnect the opener.
How to Replace Cables on an Extension Spring System
Extension systems use pulleys and safety cables to control energy. Proceed carefully.
Step-by-Step Garage Door Cables Installation for Extension Springs
- Open and secure the door; disconnect the opener.
- Remove the old cable from the bottom bracket and pulleys.
- Inspect and replace worn pulleys if needed.
- Install and route the new cable exactly as before; set cable tension so it’s taut without binding.
How to Properly Install a Safety Cable
- Thread through the center of each spring.
- Secure to sturdy brackets at both ends of the track.
- Ensure containment without rubbing or interference.
After the Installation: Testing and Maintenance
A short test and light upkeep go a long way toward safe, smooth performance.
How to Test for Proper Balance
- Unplug the opener.
- Lift the door halfway; it should stay put if balanced.
- Adjust spring tension as needed—torsion adjustments are hazardous and best left to a professional.
- Reconnect the opener.
Maintenance and Inspection Schedule
- Inspect cables every 3–6 months for damage or slack.
- Lightly lubricate with silicone spray and wipe off excess.
- Consider annual professional inspection for safety and longevity.
DIY vs. Professional Installation: Making the Right Choice
This isn’t a typical DIY project—springs and cables can cause severe injury if mishandled. DIY may save on parts but costs time and carries risk. Professionals deliver speed, safety, and warranty-backed results.
Why Hiring a Professional is Often the Safest Option
Technicians bring specialized tools, training, and safety protocols, and they can spot issues (like worn pulleys or misalignment) that lead to premature failure. When safety and reliability matter, calling a pro is the smart move.
Frequently Asked Questions about Garage Door Cable Installation
How long do garage door cables last?
Typically 5–7 years under normal use. High usage, moisture, rust, temperature swings, and poor balance shorten lifespan. Regular inspections and light lubrication help.
Can I replace just one broken cable?
No—replace cables in pairs. Mixing a new cable with an old one creates uneven tension and poor operation, often leading to another failure soon after.
What is the average cost to have garage door cables replaced?
Generally $150–$400, depending on system type (torsion is more complex), parts needed (like pulleys), and location. This includes labor, proper tools, safety protocols, and warranty coverage.
Secure Your Home with a Flawlessly Operating Garage Door
Proper garage door cables installation keeps your system quiet, balanced, and safe—reducing strain on springs and openers while preventing emergencies.
AA Garage Door Repair Services has been the trusted local choice across Twin Cities, MN, and Western WI since 2001. We offer fast, reliable, 24/7 emergency service with transparent pricing and a satisfaction guarantee, serving communities from St. Paul and Minneapolis to Woodbury, Maple Grove, Eden Prairie, Plymouth, Eagan, Apple Valley, Hudson WI, Baldwin WI, Stillwater, Prior Lake, Brooklyn Park, and Burnsville.
Whether you need urgent help or preventive care, our team is ready to restore safe, smooth operation. Request your free estimate today.