When Your Garage Door Won’t Close: Common Causes and Quick Solutions
A garage door not closing is more than just an inconvenience – it leaves your home vulnerable and your belongings exposed. Whether your door stops halfway, reverses back up, or won’t budge at all, this frustrating problem affects thousands of homeowners daily.
Quick troubleshooting checklist for a garage door that won’t close:
- Check for obstructions – Remove items blocking the door’s path or sensors
- Test your remote batteries – Replace dead batteries in your garage door remote
- Inspect safety sensors – Clean dirty sensor lenses and ensure proper alignment
- Verify manual lock – Make sure the manual lock handle isn’t engaged
- Examine tracks and rollers – Look for bent tracks or worn rollers causing binding
- Check limit settings – Adjust travel limits if the door stops too high or reverses
The good news? Many garage door closing issues have simple solutions you can handle yourself. However, some problems – like broken springs or electrical faults – require professional attention for your safety.
According to industry data, approximately 70% of garage door closing problems stem from sensor malfunctions or misalignments. Another 25% involve worn springs or rollers, while limit switch issues account for about 15% of cases. When you need reliable garage door solutions you can trust, it’s important to know what you can fix and when to call for help.
I’m David Sands, owner of AA Garage Door LLC, and I’ve been helping Twin Cities homeowners solve garage door not closing problems for over 23 years. My team and I have seen every type of closing issue imaginable, from simple sensor alignments to complex opener failures that require emergency repairs.

First-Step Fixes: Simple Checks for a Stuck Garage Door
When your garage door not closing feels like a major crisis, take a deep breath. Before you start imagining expensive repairs or emergency service calls, let’s walk through some surprisingly simple fixes that solve most closing problems. You won’t need any special tools – just a few minutes and some detective work.

Check for Obstructions
Here’s the thing about garage doors – they’re actually looking out for you. Modern garage doors have safety features that make them stop or reverse if something’s blocking their path. It’s a lifesaver, literally, since garage doors cause about 20,000 emergency room visits each year.
Start with the obvious stuff. Walk around your garage and look for anything that might be in the door’s way. That could be a kid’s bike that rolled into the path, a trash bin that got nudged over, or even something as small as a garden hose or leaf. I’ve seen doors refuse to close because of a single tennis ball!
Don’t forget to check the tracks themselves. Sometimes gravel, debris, or small objects get stuck in there, causing the rollers to bind up. Even a crumpled floor mat or loose weather stripping around the door seal can trick the safety system into thinking there’s an obstruction.
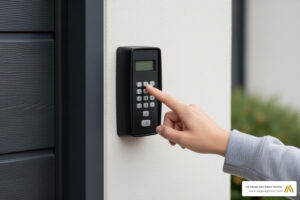
Test Your Remote and Wall Switch
If your garage door is giving you the silent treatment, your remote control is usually the first suspect. Dead batteries are the classic culprit – we’ve all stood there clicking frantically at a completely unresponsive remote, feeling pretty foolish when we finally figure it out.
Try replacing those batteries first, especially if the remote’s light seems dim or won’t come on at all. While you’re at it, test the door from different distances. If it only works when you’re standing right next to the garage, your remote’s signal is probably getting weak.
Here’s a helpful trick: try the wall-mounted button inside your garage. If the door closes when you press and hold that button but won’t respond to your remote, you’ve narrowed down the problem. It could be the remote itself, the opener’s receiver, or even your safety sensors acting up.
Sometimes remotes just lose their programming – it happens. Most garage door openers have a “learn” button on the motor unit that lets you re-sync everything. If you’re dealing with more complex opener issues, our team specializes in Garage Door Opener Repair and can get you sorted out quickly.
Is the Manual Lock Engaged?
This one makes everyone feel a little silly when it happens, but trust me – you’re not the first person to forget about the manual lock handle. Many garage doors have a slide bolt or lock handle on the inside, and sometimes it gets bumped accidentally or someone locks it for security and forgets.
Check that manual lock before you do anything else. If it’s engaged, your opener will struggle against it, potentially damaging the motor. It’s actually a great security feature when you remember you’ve used it, but it can be pretty frustrating when you don’t!
Simply disengage the lock completely and try operating your door again. Sometimes the simplest solutions are the most satisfying ones.
The Eyes Have It: Solving Safety Sensor Problems
If your garage door starts to close and then immediately reverses, or simply refuses to close at all, the culprits are very often the safety sensors. These tiny but mighty devices are the “eyes” of your garage door system, designed to detect anything in the door’s path. Federal law has mandated their inclusion on all garage door openers manufactured since 1993, a testament to their importance in preventing accidents. Our research shows that approximately 70% of garage door issues, including problems with closing, are due to sensor malfunctions or misalignments. For a deeper dive into sensor woes, check out our guide on Common Reasons for Garage Door Sensor Troubles.

How to Check and Realign Your Sensors
The safety sensors are typically located a few inches off the ground on either side of your garage door tracks. They work by sending an invisible infrared beam between them. If this beam is broken or obstructed, the door will not close.
- Sensor alignment: The most common issue is misalignment. If the two sensors aren’t perfectly aligned, they can’t “see” each other, and the door won’t close.
- LED light indicators: Most sensors have small LED lights (often green and amber/red). A steady green light usually means the receiving sensor has a clear signal. A steady amber or yellow light on the sending sensor also indicates it’s powered and transmitting. If either light is off, blinking, or red, it signals a problem. A red blinking light, for instance, often indicates a misalignment or obstruction. A yellow light can also signify an issue, requiring prompt attention to ensure proper function.
- Adjusting brackets: To realign, gently adjust the sensors. They are usually mounted on small brackets. You might need to loosen the wing nuts or screws slightly, then carefully pivot the sensor until the indicator lights turn solid. Think of it like trying to get two laser pointers to hit the same small target from across a room – a slight nudge can make all the difference.
- Tightening wing nuts: Once the lights are solid, carefully tighten the wing nuts or screws to secure the sensors in place.
Cleaning and Wiring Issues
Even if your sensors appear aligned, they might be experiencing other issues that prevent the door from closing.
- Dirty lenses: Over time, dust, dirt, cobwebs, or even insect nests can accumulate on the sensor lenses, obstructing the infrared beam. It’s like trying to see through a dirty window.
- Solution: Gently wipe the lenses with a soft, clean, damp cloth. Avoid harsh cleaners that could scratch the plastic.
- Check sensor wiring: The wires connecting the sensors to the opener unit can sometimes become loose, frayed, or damaged.
- Loose connections: Check where the wires connect to the sensors and the opener motor head. Gently push them in to ensure a snug fit.
- Damaged wires: Look for any visible nicks, cuts, or signs of corrosion. Even a small break in the wire can disrupt the signal. If you find damaged wires, they will need to be repaired or replaced.
- Sunlight interference: In some cases, direct sunlight hitting one of the sensor lenses can mimic an obstruction, preventing the door from closing. This is more common at certain times of day or year. If this is the case, you might need to install a small shield around the sensor to block the direct sunlight.
When Your Garage Door is Not Closing: Mechanical and Electrical Culprits
If you’ve checked the simple stuff – obstructions, remote batteries, and sensors – and your garage door not closing issue persits, it’s time to dig deeper. These mechanical and electrical problems can be trickier to diagnose, but understanding them can save you time, money, and frustration. Think of this as detective work – we’re looking for clues that tell us what’s really going on inside your garage door system.
After two decades of troubleshooting garage doors, I’ve learned that the most persistent closing problems usually stem from three main areas: incorrect opener settings, worn mechanical parts, or failing electrical components. Let’s walk through each one so you can identify what might be causing your headaches.
Adjusting Travel Limits and Force Settings
Your garage door opener is smarter than you might think. It has built-in “brains” that determine exactly how far your door should travel and how much force it should use. When these settings get out of whack – which happens more often than you’d expect – your door can act like a confused teenager who doesn’t know when to stop.
Travel limit problems are responsible for about 15% of garage door closing issues. If your door reverses immediately after hitting the floor, the opener thinks it’s encountered an obstruction when it’s actually just doing its job. This happens when the “down limit” is set too low, making the opener overly sensitive.
On the flip side, if your door stops a few inches short of closing, the down limit is set too high. It’s like telling someone to walk to the corner but stopping them half a block away – frustrating and ineffective.
Most garage door openers have adjustment screws or dials labeled something like “Down Travel” or “Close Limit.” These are usually located on the motor unit itself. Here’s where I always tell homeowners to be patient: small adjustments make big differences. A quarter-turn of the adjustment screw can completely change how your door behaves.
The key is making incremental changes and testing after each adjustment. Always consult your opener’s manual for specific instructions, as different manufacturers use different systems. Some newer openers even have digital displays that make adjustments easier, while older models might require you to count turns of a screw.
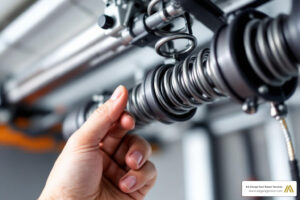
Inspecting Tracks, Rollers, Springs, and Cables
Now we’re getting into the heavy-duty components that do the real work of moving your garage door. These parts handle hundreds of pounds of weight thousands of times per year, so it’s no wonder they eventually wear out. According to our service records, worn springs and rollers account for about 25% of all closing problems.

Look for bent or misaligned tracks that could be causing the rollers to bind. Check the rollers themselves for signs of wear, like cracks or broken bearings. Worn-out rollers can make the door noisy and difficult to move. Similarly, inspect the cables for any fraying or rust. A damaged cable is a serious safety hazard and should be addressed immediately by a professional.
Signs of a Faulty Opener or Logic Board
Sometimes, the problem isn’t with the door itself but with the opener’s motor or its electronic brain, the logic board. If you hear the opener motor running or humming but the door doesn’t move, you could be dealing with a stripped gear inside the unit. This often happens after years of wear and tear.
Other signs point to the logic board. If your door operates erratically, the lights don’t work correctly, or it doesn’t respond to the remote or wall switch at all, the logic board might be the culprit. Power surges from storms can fry these sensitive electronics. A faulty logic board or a failed travel module can prevent the opener from knowing when to start or stop, rendering it useless. These are complex electrical repairs that are best left to a professional.
Safety First: When to Call a Professional
Look, I get it. There’s something deeply satisfying about fixing things yourself. That moment when you solve a problem with your own two hands? Pure gold. But when it comes to garage door not closing issues, some repairs are like wrestling with a bear – you might win, but the odds aren’t in your favor.
Here’s the sobering reality: garage doors are responsible for approximately 20,000 emergency room visits each year. Many of these accidents happen when well-meaning homeowners try to tackle repairs that require professional expertise. As someone who’s been in this business for over two decades, I’ve seen the aftermath of DIY attempts gone wrong, and trust me, it’s not pretty.
High-tension springs are the biggest danger zone. These coiled metal powerhouses store enough energy to lift your entire garage door – we’re talking about hundreds of pounds of force. When a spring breaks or needs adjustment, it can release that stored energy like a cannon. I’ve witnessed springs snap with such force that they’ve punched holes in drywall. This isn’t a job for weekend warriors; it requires specialized tools and years of training to handle safely.
The sheer weight of your garage door is another serious concern. Most residential garage doors weigh between 150 to 400 pounds. When the springs or cables fail, that massive weight becomes an uncontrolled falling object. If you’re underneath when it comes down, the consequences can be catastrophic.
Electrical hazards present their own set of risks. While swapping out remote batteries is perfectly safe, anything involving the opener’s wiring, logic board, or power supply should be left to qualified technicians. Electric shock is a real possibility, and you could end up damaging expensive components that would otherwise be repairable.
Damaged tracks or frayed cables might seem like straightforward fixes, but they require precise alignment and proper tensioning. Get it wrong, and your door could derail or become dangerously unbalanced. These components work together as a finely tuned system – mess with one part incorrectly, and you can throw everything out of whack.
Sometimes the wisest move is recognizing when you’re in over your head. If you’ve worked through our troubleshooting steps and your garage door not closing problem persists, that’s often a sign the issue runs deeper than surface-level fixes. Complex problems require professional diagnosis and specialized equipment.
For a detailed breakdown of which repairs are best left to the experts, check out our guide on 3 Garage Door Repairs Best For The Professionals. And remember, if you suspect broader electrical issues in your home, don’t hesitate to call a licensed electrician to safely identify and resolve the problem.
The bottom line? Your safety and your family’s well-being are worth far more than the cost of professional service. When in doubt, make the smart call.
Frequently Asked Questions about Garage Doors That Won’t Close
These are the questions that keep me busy at AA Garage Door! After two decades of helping Twin Cities homeowners, I’ve heard just about every variation of “Why won’t my garage door close?” Let me share the answers to the most common ones.
Why is my garage door not closing all the way?
That frustrating gap between your door and the floor has several usual suspects. Sensor blockage or misalignment tops the list – even a spider web or a slight bump can throw these sensitive devices off. Your door’s safety system treats any sensor issue like there’s a car in the way, so it simply refuses to close completely.
Incorrect limit settings are another frequent culprit, especially after power outages. Think of it like telling someone to stop walking before they reach the destination – your opener might be programmed to stop too early. Worn rollers or springs can also cause this problem, as they prevent smooth movement and proper balance.
Don’t overlook the basics either. A track obstruction like a pebble, manual lock engagement, or even a disengaged trolley from pulling the emergency release cord can leave you scratching your head. The good news? Most of these issues have straightforward fixes, starting with those safety sensors.
What should I do if my garage door starts to close then goes back up?
When your garage door not closing involves that maddening “close-then-reverse” dance, your safety system is doing its job – perhaps a little too well. This safety reversal feature protects anything in the door’s path, but it can be triggered by surprisingly small issues.
Check those sensors first – I can’t stress this enough. Clean both sensor lenses with a soft cloth, removing any dust, cobwebs, or smudges that might block the invisible beam between them. Then ensure they’re perfectly aligned, with solid indicator lights rather than blinking ones.
Next, scan the floor for any obstructions – even a small stone or debris under the weather seal can trigger the reversal. If everything looks clear, you might need to adjust the down-force sensitivity on your opener. This setting determines how much resistance the door tolerates before reversing. Just be careful not to make it too insensitive, as that defeats the safety purpose.
Why won’t my garage door close and the light is flashing?
That flashing light is your opener’s way of communicating – like Morse code for garage doors! The most common culprit behind a flashing opener light is sensor misalignment or obstruction. Many models flash 10 times specifically for sensor issues, essentially saying “I can’t see clearly enough to close safely.”
The key is counting the flashes carefully. Different manufacturers use different codes – some LiftMaster units flash 4 times for sensor problems, while others might use different sequences for wiring shorts or other issues. Consult your opener manual for the specific diagnostic codes, as each brand has its own “language.”
If you’ve lost your manual, most manufacturers have them available online. Just search for your model number plus “troubleshooting guide.” This little detective work can save you time and help you determine whether it’s a quick DIY fix or time to call in the professionals.
Get Your Garage Door Back on Track
When you’re dealing with a garage door not closing, it’s natural to feel frustrated – especially when you’re already running late or just want to secure your home for the night. The good news is that we’ve walked through a comprehensive troubleshooting approach that can help you identify and often resolve the issue yourself.
Start with the basics first. Clear any obstructions from the door’s path, test your remote batteries, and give those safety sensors a thorough cleaning and alignment check. These simple steps resolve the majority of closing problems and don’t require any special tools or technical expertise. About 70% of garage door closing issues stem from sensor problems alone.
If the basic checks don’t solve your garage door not closing problem, it’s time to look deeper. Check your opener’s limit settings – these tell your door exactly where to stop when closing. Inspect your tracks, rollers, and springs for wear or damage, and don’t forget to keep these moving parts well-lubricated for smooth operation.
However, there’s a crucial line between DIY fixes and professional repairs. High-tension springs, damaged cables, and complex electrical issues are not weekend projects. These components can cause serious injury if handled incorrectly, and frankly, they’re not worth the risk when professional help is readily available.
For homeowners throughout St. Paul, Minneapolis, and the Twin Cities area, you don’t have to tackle these complex repairs alone. At AA Garage Door Repair Services, we’ve been helping neighbors like you solve garage door not closing problems since 2001. Our team understands how disruptive a malfunctioning garage door can be, which is why we offer fast, reliable service with transparent pricing and a satisfaction guarantee.
Whether you need immediate help with a door that’s stuck open overnight or want to schedule a comprehensive inspection to prevent future issues, we’re here when you need us. Don’t let a stubborn garage door compromise your home’s security. Schedule your garage door repair in Apple Valley today, and we’ll get it back on track quickly and safely.