Why That Loud Bang Means You’re Facing a Serious Decision
Replace garage spring jobs are among the most common—and most dangerous—garage door repairs. When a spring breaks, your door becomes nearly impossible to lift, and you’re left wondering: should I fix this myself or call a professional? For over 23 years, AA Garage Door LLC has provided for all garage door needs in the Twin Cities area, and we know this repair carries significant risk.
Quick Answer: Can You Replace a Garage Door Spring Yourself?
- Extension Springs: Yes, with caution. Safer for DIY with proper tools and safety cables.
- Torsion Springs: Not recommended. Under extreme tension; risk of severe injury or death.
- Required Tools: Winding bars, safety glasses, gloves, socket wrench, clamps.
- Estimated DIY Cost: $50-$150 for parts, plus tools.
- Professional Cost: $200-$350 for complete replacement with warranty.
- Time Needed: 2-4 hours for experienced DIYers; 1-2 hours for professionals.
If you attempt torsion spring replacement, you are working with components under 200+ pounds of tension. One mistake can result in hospitalization or worse.
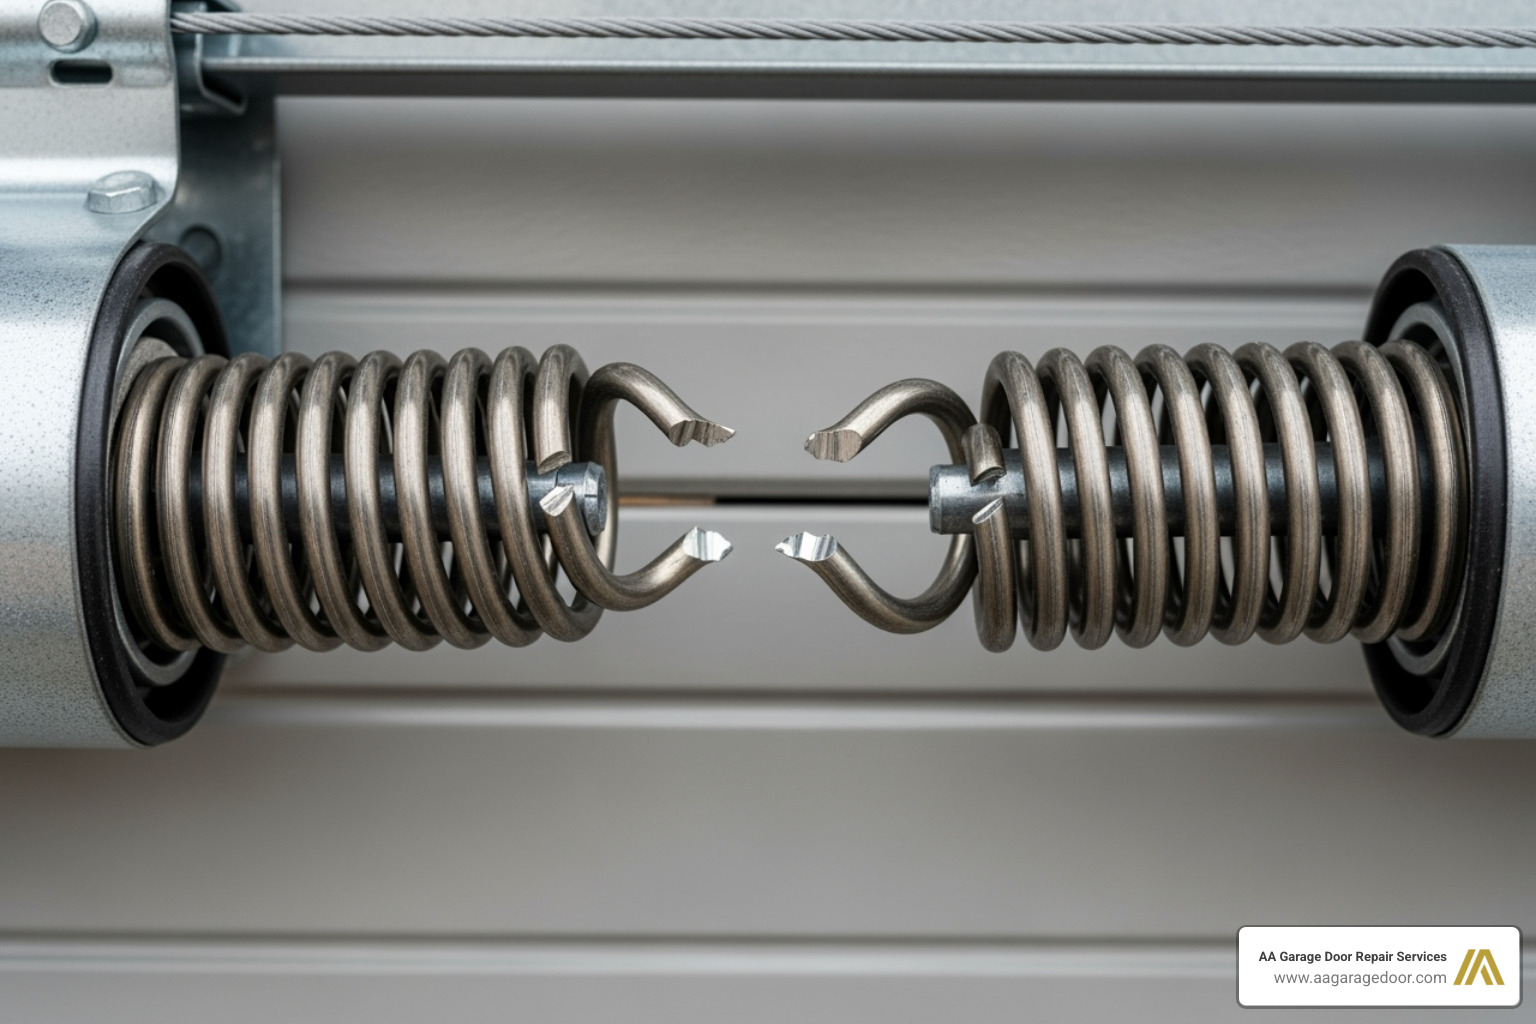
Garage door springs counterbalance the door’s weight, allowing it to be lifted easily. When one breaks—often with a loud bang—the door becomes dead weight. Torsion springs, mounted on a shaft above the door, are the modern standard. Extension springs, which stretch along the horizontal tracks, are found on older doors.
Standard springs are rated for about 10,000 cycles (7-10 years of use). Once they fail, they must be replaced. The national average cost for professional replacement is between $200 and $350. While DIY can save money, it’s crucial to weigh the savings against the risk.

Before You Begin: Safety, Tools, and Identification
Before attempting to replace garage spring components, understand that this is not a typical DIY project. The stored mechanical energy can cause life-altering injuries if released unexpectedly. While extension spring replacement is manageable for a careful DIYer, torsion springs are a different story.

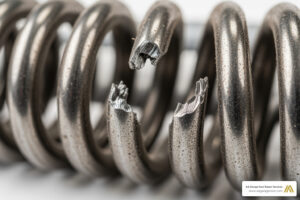
The Unmistakable Signs of a Broken Spring
- A Loud Bang: The classic symptom, sounding like a gunshot as the spring fractures.
- Door Won’t Open: The opener cannot lift the door’s full weight without the spring’s counterbalance.
- Impossibly Heavy Door: When disconnected from the opener, a door with a broken spring can weigh 200-300 pounds.
- Crooked Door: One spring in a two-spring system has failed, causing the door to lift unevenly.
- Visible Gap: A clear separation in the coils of a torsion spring.
- Saggy Spring: An extension spring that appears stretched out or loose when the door is closed.
Garage door springs have a finite lifespan. To learn more, read our guide: How long do garage door springs last before needing replacement.
Torsion vs. Extension Springs: Know Your System
Identifying your spring type is critical for assessing the danger involved.
- Torsion Springs: Mounted on a metal shaft above the garage door. They twist to store and release energy. Most modern doors use this system as it’s more durable and balanced. When they break, they typically remain on the shaft, which is a key safety feature.
- Extension Springs: Run parallel to the horizontal tracks on each side of the door. They work by stretching and contracting. When these break, they can become dangerous projectiles, which is why safety cables running through the center of each spring are mandatory.
Specialized systems like EZ-Set or Torquemaster (found on Wayne Dalton doors) use proprietary mechanisms and should be serviced by a professional.
Essential Tools and Parts You’ll Need
Using improper tools is the leading cause of injury in DIY spring replacement.
- Winding Bars: The most critical tool for torsion springs. You need two hardened steel bars (1/2-inch diameter, 18+ inches long). Never use screwdrivers or other substitutes. You can buy garage door winding bars at Amazon.
- Socket Wrench Set & Adjustable Wrench: For various nuts and bolts.
- Locking Pliers or C-Clamps: To secure the door to the track.
- Sturdy Ladder, Safety Glasses, and Work Gloves: Essential for personal safety.
- Measuring Tape & Marker: For accurate measurements and marking positions.
- Replacement Parts: Correctly sized springs are crucial. Inspect lift cables and the center bearing for wear and replace if necessary.
How to Measure for the Correct Replacement Spring
Installing the wrong spring will cause poor balance and strain your opener. For torsion springs, you need four key measurements:
- Wire Size: Measure 20 coils and divide the length by 20 (e.g., 4.5 inches / 20 = 0.225 wire size).
- Inside Diameter (ID): Usually 1.75″ or 2″ for residential doors.
- Unwound Spring Length: Measure the length of the spring coils only, not the cones.
- Wind Direction: Facing the spring, if the end wire points right, it’s right-wind. If it points left, it’s left-wind. A two-spring system has one of each.
Color codes can help identify spring specifications, but always rely on physical measurements as paint fades. For a visual guide, see this resource: How to Measure Your Replacement Torsion Springs.
How to Replace Garage Door Torsion Springs: A Step-by-Step Guide
WARNING: Torsion springs are under extreme tension and can cause serious injury or death. Proceed only if you are confident, have the correct tools, and are prepared for the inherent risks. If in doubt, please call a professional.
This is not a typical DIY project. The stored energy in these springs is immense, and a mistake can be catastrophic. For a sobering, engineering-focused perspective on the dangers, read Richard Kinch’s account: A detailed look at the dangers of DIY spring replacement. If you understand the risks and are properly equipped, follow these steps without shortcuts.

Step 1: Prepare the Door and Unwind the Old Spring(s)
- Disconnect Power: Unplug your garage door opener from the wall outlet.
- Disengage Opener: Pull the emergency release cord to separate the door from the opener.
- Secure the Door: Clamp the door to the track on both sides using locking pliers or C-clamps just above the bottom rollers. This prevents the door from moving.
- Unwind the Spring: Insert a winding bar fully into the winding cone. While holding it securely, loosen the set screws on the cone. The tension will transfer to the bar. Using a second winding bar, unwind the spring quarter-turn by quarter-turn in a “leapfrog” motion. Never let go of a bar until the other is securely in place. Repeat for the second spring if you have one.
Step 2: Remove the Old Springs and Install the New Ones
- Loosen Hardware: Loosen the set screws on the cable drums at each end of the torsion shaft.
- Disconnect Cables: Unhook the lift cables from the bottom brackets of the door.
- Free the Shaft: Loosen the bolts holding the stationary cones to the center bracket.
- Swap the Springs: Slide the torsion shaft out enough to remove the old springs and cable drums. Slide the new springs on, ensuring the correct wind direction (left-wind spring on the left, right-wind on the right). Secure the stationary cones to the center bracket.
- Reinstall Hardware: Reinstall the cable drums and reattach the lift cables to the bottom brackets, ensuring they are routed correctly.
Step 3: Wind the New Springs and Secure the System
This is the most dangerous step. If you have any doubts, stop and call a professional for help with your garage door spring.
- Set the Cables: Pull the lift cables taut and wind them by hand onto the drums, ensuring they sit in the grooves. Firmly tighten the cable drum set screws.
- Wind the New Springs: Insert a winding bar and begin winding the spring up, away from the door. Use the same leapfrog method as before. A standard 7-foot door requires about 7.5 full turns (30 quarter-turns), and an 8-foot door needs 8.5 to 9 turns (34-36 quarter-turns). Always follow the manufacturer’s specifications.
- Secure the Cones: Once the correct tension is applied, hold the final bar in place and tighten the winding cone set screws securely (snug plus a quarter-turn).
- Lubricate: Apply a silicone-based garage door lubricant to the springs to reduce friction and noise.
How to Replace Garage Door Extension Springs: A Simpler, Safer Task
If your door uses extension springs, the replacement job is significantly less dangerous than with torsion springs. However, “safer” does not mean risk-free. The most critical component for this job is the safety cable, a thin steel cable that runs through the center of each spring to contain it if it breaks.
Always replace extension springs in pairs. Even if only one is broken, the other has endured the same amount of wear and is likely to fail soon. Replacing both ensures balanced operation and prevents a second repair job in the near future.

Step 1: Secure the Door and Release Spring Tension
With extension springs, the tension is lowest when the door is fully open.
- Open the Door: Raise the garage door completely. If using an opener, unplug it once the door is up.
- Secure the Door: Place C-clamps or locking pliers on the track just below the bottom rollers on both sides to prevent the door from falling.
- Disconnect the Old Spring: With the tension released, carefully unhook the old spring from the rear track hanger and the pulley at the other end.
Step 2: Install the New Spring and Safety Cable
- Thread the Safety Cable: Before installing the new spring, feed the safety cable completely through its center.
- Attach the Cable and Spring: Secure one end of the safety cable to the rear track hanger bracket. Then, attach the new spring to the same bracket.
- Connect the Pulley: Connect the pulley (which is attached to the lift cable) to the other end of the new spring.
- Secure the Cable: Run the other end of the safety cable to a sturdy anchor point near the front of the track, pull it taut (not tight), and secure it.
- Repeat: Repeat the entire process for the spring on the other side of the door.
Once both springs and safety cables are installed, remove the clamps and perform a balance test. If you’d prefer a professional handle this, our team at AA Garage Door Repair Services is ready to provide fast, reliable service.
The Final Checks: Balancing, Testing, and Common Mistakes to Avoid
A properly installed spring that isn’t balanced correctly can damage your door and opener. This final stage ensures the job is truly complete.
How to Perform a Garage Door Balance Test
A balanced door should feel nearly weightless and hold its position when stopped halfway.
- Disconnect the Opener: Ensure the opener is disengaged from the door.
- Lift the Door: Manually lift the door to about waist height.
- Let Go: Carefully release the door.
- A balanced door will stay in place or move very slowly.
- If the door rises, the springs are too tight. Reduce tension slightly (e.g., unwind torsion springs a quarter-turn).
- If the door falls, the springs are too loose. Add tension in small increments.
Common Mistakes That Can Lead to Disaster
Avoid these common and dangerous errors when you replace garage spring systems:
- Using Incorrect Tools: Never use screwdrivers, tire irons, or anything other than hardened steel winding bars for torsion springs. This is the #1 cause of severe injury.
- Under- or Over-winding Springs: Incorrect tension wears out your opener motor or puts excessive stress on door components, leading to premature failure.
- Forgetting Safety Cables: On extension springs, safety cables are not optional. They prevent a broken spring from becoming a high-speed projectile.
- Mismatching Spring Size: Installing the wrong size spring will make proper balancing impossible.
- Working Alone: Especially with torsion springs, having a helper can be a crucial safety measure.
- Replacing Only One Spring: In a two-spring system, both springs have the same amount of wear. If one broke, the other is not far behind. Always replace them in pairs.
- Ignoring Other Worn Parts: Inspect lift cables, pulleys, and rollers while the system is disassembled. Replacing them now is much easier than later.
Sometimes, the smartest decision is knowing when to call an expert. For more insight, read about 3 reasons to have damaged garage door springs professionally replaced.
DIY vs. Professional: When to Replace Garage Spring Yourself
The decision to replace garage spring components yourself comes down to a simple calculation: cost vs. risk. While the financial savings of a DIY project are appealing, the potential consequences of a mistake can be severe.

The True Cost of a DIY Replacement
Beyond the price of parts, a DIY replacement has hidden costs:
- Parts & Tools: Springs can cost $50-$150. If you don’t have proper winding bars (~$25) and other tools, the cost increases.
- Your Time: Expect 2-4 hours for an experienced DIYer, but significantly more if it’s your first time.
- Risk of Injury: A mistake can lead to medical bills and lost wages that far exceed any potential savings.
- Potential for Damage: Incorrect installation can damage door panels, tracks, or the opener, turning a small saving into a major expense.
- No Warranty: If your DIY repair fails, you’re back to square one, paying for parts and doing the labor all over again.
The national average for professional replacement is $200-$350. This means your actual savings might only be $100-$200, assuming everything goes perfectly. For a complete breakdown, see our guide on The true cost of garage door repair.
When to Absolutely Call a Professional
For certain situations, calling a professional is the only safe choice.
- You lack the proper tools, especially hardened steel winding bars.
- You are uncomfortable working with high-tension systems. Trust your instincts.
- You have torsion springs. The risk of severe injury is too high for most homeowners.
- Your door, tracks, or other components are damaged. A new spring won’t fix underlying issues.
- You have a specialized system like EZ-Set or Torquemaster.
If you’re in the Twin Cities area and find yourself in over your head, our team at AA Garage Door Repair Services offers fast, reliable service. We provide expert garage door repair in St. Paul, MN and the surrounding communities.
Frequently Asked Questions about Garage Door Spring Replacement
How much does it cost to have garage door springs professionally replaced?
The national average for a professional to replace two garage door springs is between $200 and $350, which includes parts and labor. The final price depends on the spring type (torsion vs. extension), your door’s size and weight, and regional labor rates. High-cycle springs, which last twice as long as standard ones, may increase the upfront cost but offer better long-term value. For a detailed estimate, see our guide on garage door spring repair price.
Can I replace just one spring?
While you technically can, it is strongly advised against. Garage door springs are installed in pairs and experience the same amount of wear. If one breaks, the other is likely to fail soon after. Replacing both springs at the same time ensures the door is properly balanced, prevents excess strain on your opener, and saves you the cost and hassle of a second service call in the near future.
How long do garage door springs last?
Standard residential garage door springs are rated for about 10,000 cycles (one cycle is one open-and-close). For an average family, this translates to a lifespan of 7-10 years. Factors that affect this include:
- Frequency of Use: More daily use means a shorter lifespan.
- Climate: Extreme cold, like that in Minnesota and Wisconsin, can make springs more brittle and prone to snapping.
- Door Weight: Heavier doors put more stress on springs.
- Maintenance: Regular lubrication can help extend a spring’s life.
High-cycle springs are an option for homeowners seeking a longer-lasting solution, often providing 15-20 years of service.
Conclusion
When a garage door spring breaks, you face a decision that balances cost savings against personal safety. This guide has detailed the steps to replace garage spring components, highlighting the critical differences between extension and torsion systems. The conclusion is clear: while replacing extension springs can be a manageable DIY task for a careful and well-equipped person, torsion spring replacement carries a high risk of catastrophic injury and is best left to trained professionals.
The question isn’t just whether you can do it, but whether you should. The potential savings of a few hundred dollars can be quickly erased by the cost of a medical emergency or damage to your garage door system. A professional installation not only guarantees safety but also comes with a warranty for peace of mind.
If you’re facing a broken spring in St. Paul, the Twin Cities, or Western Wisconsin, and feel uncertain about tackling this repair, that’s a sign of good judgment. AA Garage Door Repair Services offers fast, reliable, and safe garage door spring replacement. Our expert technicians have the experience and tools to get the job done correctly and safely, backed by a satisfaction guarantee. Your garage door is the largest moving object in your home; ensure it’s repaired with the expertise it deserves.