Why Garage Door Spring Tension Matters for Safe Operation
Garage door spring tension is the force that counterbalances your door’s weight, making it easy to open and close. When spring tension is off, your door may sag, slam shut, feel incredibly heavy, or refuse to stay open. Here’s what you need to know:
Quick Answer: Signs Your Spring Tension Needs Adjustment
- Door closes too fast or slams shut
- Door won’t stay open at the halfway point
- Door feels extremely heavy when lifting manually
- One side of the door hangs lower than the other
- Loud bang or snapping noise during operation
- Visible gaps or separation in spring coils
A sagging garage door isn’t just an inconvenience—it’s a safety hazard. When springs lose proper tension, your garage door opener works harder, parts wear out faster, and the risk of the door crashing down increases dramatically. Over 30,000 people are injured by garage doors each year, many due to spring-related failures.
The good news? Testing your door’s balance takes just a few minutes, and understanding when to adjust spring tension versus when to call for expert garage door repair services can save you money and prevent serious injury.
Why this matters: Your garage door weighs 200-300 pounds. Without properly tensioned springs doing the heavy lifting, that entire weight falls on your opener—or worse, on whatever (or whoever) is underneath.
I’m David Sands, owner of AA Garage Door LLC with over 23 years of hands-on experience diagnosing and resolving garage door spring tension issues across the Twin Cities. I’ve seen how proper spring maintenance prevents costly repairs and dangerous malfunctions, and I’m here to walk you through what you need to know.
, then release that energy to assist lifting when door opens, reducing the weight from 200-300 lbs to under 10 lbs of lifting force - garage door spring tension infographic infographic-line-5-steps-elegant_beige")
Handy garage door spring tension terms:
First Things First: Safety, Tools, and Spring Identification
Before we dive into the nitty-gritty of garage door spring tension, let’s talk about the absolute most important aspect: safety. Working with garage door springs is not like tinkering with a bicycle chain. These components are under immense pressure, storing enough energy to cause severe harm if mishandled. Statistics are stark: over 10,000 people are hurt each year from garage door spring accidents, and tragically, over 30 people die. Improper tools or skipped safety steps can lead to serious injury or even death. We cannot stress this enough: always prioritize safety.
Understanding Your Springs: Torsion vs. Extension
Your garage door relies on a counterbalance system to lift its heavy weight. This system uses springs, and there are two main types you’ll find in residential garages:
Torsion Springs: These are typically mounted on a metal shaft directly above your garage door opening. When the door closes, cables attached to the bottom corners of the door wind the torsion springs, twisting them and storing rotational energy. When the door opens, these springs unwind, releasing that stored energy to help lift the door. They’re common in most modern residential setups. If you’d like to learn more about different types of springs, we have a detailed guide.
Extension Springs: These springs run parallel to the horizontal tracks on either side of your garage door. When the door closes, these springs stretch, storing linear energy. When the door opens, they contract, releasing the energy to assist the lift. Extension springs usually have safety cables threaded through them to prevent them from flying across the garage if they break.
Identifying your spring type is crucial because the adjustment methods and safety precautions differ significantly. Take a moment to look at your garage door system. Do you see a long bar with springs coiled around it just above the door, or do you see springs running along the side tracks? Knowing this will guide your next steps.
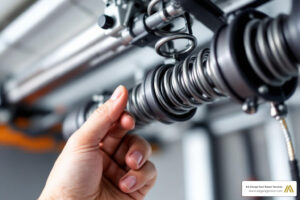
 and tools (winding bars, C-clamp, ladder) - garage door spring tension")
Key Signs of Incorrect Garage Door Spring Tension
Our garage doors are often the unsung heroes of our homes, opening and closing thousands of times over their lifespan. But like any hard worker, they show signs of fatigue when their garage door spring tension is off. Recognizing these symptoms early can prevent more serious problems down the line.
Here are the common indicators that your springs might need attention:
- Door Opens/Closes Too Fast or Slams Shut: If your garage door slams down with alarming speed, or races upwards as if trying to escape, it’s a clear sign the spring tension is incorrect. Too little tension will cause it to crash, while too much might make it shoot up. This isn’t just annoying; it can damage the door, the opener, and anything in its path.
- Door Feels Heavy: If you try to lift your garage door manually (with the opener disconnected, which we’ll cover soon!) and it feels like you’re trying to bench press a small car, your springs aren’t doing their job. They’re meant to counterbalance the door’s weight, making it feel almost weightless.
- Door Won’t Stay Open: A properly balanced door should stay put when lifted halfway. If you lift it and it immediately starts to drift down, the spring tension is too low. If it shoots up and won’t stay down, the tension is too high.
- Crooked or Uneven Movement: Does your garage door look like it’s doing a strange dance when it opens or closes? If one side moves faster or hangs lower than the other, it indicates an imbalance in the spring system. This could mean one spring has lost tension more than the other, or one is broken.
- Loud Noises (Bang, Creak, Squeak, Grind): While some noise is normal, a sudden, loud “bang!” often signals a broken spring. Other sounds like screeching, grinding, or excessive creaking can indicate worn-out, dry, or improperly tensioned springs. Lubricating your springs annually can often resolve squeaking, but persistent or new loud noises are a red flag.
- Visible Gap in Spring Coils: For torsion springs, a visible gap or separation in the coils is a definitive sign of a broken spring. If you see this, do not attempt to operate your door.
- Opener Straining: If your garage door opener sounds like it’s struggling more than usual, groaning or working harder to lift the door, it’s often a sign that the springs are failing to assist it properly. This puts undue stress on the opener, shortening its lifespan.
These are all common garage door problems that homeowners face. Ignoring these signs can lead to further damage, costly repairs, and potential safety hazards.
Essential Tools and Safety Gear
If you’re considering checking or even attempting minor adjustments to your garage door springs, having the right tools and, more importantly, the right safety gear is non-negotiable.
Safety Gear (ALWAYS Use These!):
- Safety Glasses: Eye protection is paramount. Springs can snap, and components can fly.
- Heavy-Duty Gloves: Protect your hands from sharp edges, pinch points, and spring coils.
- Hard Hat (Recommended for Torsion Springs): While it might feel overkill, a hard hat offers crucial protection against unexpected spring recoil or falling parts, especially when working directly under torsion springs.
- Sturdy Ladder: Ensure your ladder is stable and rated for your weight plus any tools. You’ll be reaching overhead, so wobbling is not an option.
Tools You’ll Need:
- Winding Bars (for Torsion Springs ONLY): These are specialized steel rods, typically 18 to 24 inches long, with a diameter that fits snugly into the winding cone holes of torsion springs. NEVER use substitutes like screwdrivers, rebar, or pliers handles. This is extremely dangerous and a leading cause of severe injury.
- C-Clamp or Locking Pliers: Essential for securing the garage door in an open position (for extension springs) or holding the torsion tube (for torsion springs) to prevent unexpected movement.
- Adjustable Wrench: Useful for loosening and tightening set screws on winding cones.
- Marker or Tape: To mark spring coils or winding cone positions for precise adjustments.
- Flashlight/Headlamp: To illuminate dimly lit areas, especially when inspecting springs.
Before you touch anything, always remember to unplug your garage door opener from its power source. This prevents accidental operation while you’re working on the system.
How to Safely Test Your Garage Door’s Balance
One of the most valuable checks you can perform as a homeowner is the garage door balance test. This simple procedure tells you a lot about your garage door spring tension and whether your springs are doing their job correctly. It takes just a few minutes and can prevent a lot of headaches (and potential injuries!) down the road.
Here’s how we recommend you safely test your garage door’s balance:

- Close the Garage Door Completely: Ensure the door is fully closed before you begin. This is the safest starting position.
- Disconnect the Opener: This is a crucial safety step. Locate the emergency release cord (it’s usually a red rope with a handle) hanging from the trolley that connects your opener to the door. Pull this cord down and back towards the opener to disengage the door from the automatic opener. You should hear a click, and you’ll then be able to move the door manually.
- Manually Lift the Door: Carefully grasp the bottom edge of the garage door or a sturdy handle. Lift the door slowly by hand.
- Observe at the Halfway Point: Lift the door until it’s about halfway open (around 36 inches or three feet off the ground). Now, let go of the door.
- What a Balanced Door Does: A properly balanced garage door, with correct garage door spring tension, should stay in that halfway position on its own. It might drift slightly (a foot or so), but it should hold its position without falling or shooting upwards. The effort to lift it should feel minimal—like lifting something that weighs less than 10 pounds.
What an Unbalanced Door Does:
- If the door falls quickly: The springs are too loose, or one (or both) are broken. They’re not providing enough counterbalance.
- If the door shoots upwards quickly: The springs are too tight, providing too much counterbalance.
- If it moves crookedly or one side falls/rises faster: The springs are unevenly tensioned, or one spring is weaker/broken.
Reconnect the Opener: Once you’ve completed the test, close the garage door completely. The trolley should automatically re-engage with the door when it reaches the closed position (you might hear another click). If it doesn’t, you may need to manually slide the trolley back to the door until it connects.
If your garage door fails this balance test, it indicates a problem with your garage door spring tension or the springs themselves. An unbalanced door puts extra strain on your opener and can be extremely dangerous. For a visual guide, you can refer to resources like how to check if your door is balanced.
Adjusting Garage Door Spring Tension: A Step-by-Step Guide
Adjusting garage door spring tension is a task that requires precision, patience, and a deep respect for the immense forces involved. While we’ll outline the general steps, we strongly caution homeowners against attempting these adjustments themselves, especially for torsion springs. As we mentioned, these springs are under high tension and can cause severe injury if mishandled. Statistics show that improper tools or skipped safety steps lead to numerous accidents each year.
Trying to adjust garage door springs yourself can lead to injuries and even death. We always recommend calling a professional for spring adjustments. Even a simple adjustment can go wrong.
Here’s a quick comparison of the two spring types and their adjustment considerations:
| Feature | Extension Springs (Side-Mounted) | Torsion Springs (Above Door) |
|---|---|---|
| Adjustment Difficulty | Moderate (still high risk) | High (extreme risk) |
| Tools Needed | C-clamps, sturdy ladder, sometimes pliers | Winding bars, adjustable wrench, C-clamps, sturdy ladder, safety gear |
| Safety Risks | Can snap and fly across garage if not properly secured | Stored rotational energy can cause severe injury if bars slip |
| DIY Feasibility | Possible for very minor adjustments by experienced DIYers, but still not recommended due to safety. | Absolutely not recommended for DIY. Professional intervention is critical. |
Adjusting Extension Springs (Side-Mounted)
If you have extension springs, their adjustment typically involves changing the attachment point of the spring or cable.
- Open the Door Fully: For extension springs, you’ll need the door in the fully open position.
- Secure the Door: Use sturdy C-clamps or locking pliers on the tracks just below the bottom rollers to prevent the door from accidentally closing. This is vital.
- Locate the S-Hook/Attachment Point: Extension springs usually connect to a pulley system via an S-hook or a similar attachment.
- Increase Tension: If your door is falling too fast or feels heavy, you need to increase tension. This usually means moving the S-hook or the cable attachment point to a higher hole or a tighter link in the chain, effectively shortening the spring’s resting length.
- Decrease Tension: If your door is shooting up or is too difficult to pull down, you need to decrease tension. Move the S-hook or cable attachment point to a lower hole or a looser link.
- Adjust Incrementally: Make small adjustments—one hole or one link at a time—and then carefully remove the clamps, reconnect the opener, and perform the balance test again. Repeat until the door is balanced.
- Ensure Evenness: If you have two extension springs, ensure you make the same adjustments to both sides to maintain balance.
Safely Adjusting Garage Door Spring Tension on Torsion Systems
!!! EXTREME DANGER WARNING !!! Adjusting torsion springs is one of the most dangerous tasks in garage door maintenance. These springs are under hundreds of pounds of torque. A slip of a winding bar can result in broken bones, severe lacerations, or worse. We strongly, unequivocally recommend that you DO NOT attempt to adjust torsion springs yourself. This is a job for trained professionals.
If you’re still curious about the process a professional would undertake, here’s a general overview:
- Door in Closed Position: Torsion springs are adjusted with the garage door fully closed.
- Unplug Opener: Always disconnect power to the garage door opener.
- Secure Door: Professionals may use C-clamps to secure the door to the track, especially if any components need to be removed.
- Loosen Set Screws: The winding cone (the part of the spring where the winding bars are inserted) is held in place by set screws. These must be carefully loosened.
- Use Two Winding Bars: A professional will use two proper steel winding bars. One bar is inserted into a hole in the winding cone, and the spring is turned. The second bar is then inserted into the next hole, holding the spring’s position while the first bar is removed and re-inserted. This “leapfrog” method allows for controlled winding or unwinding.
- Quarter-Turn Adjustments: Adjustments are made in quarter-turn increments (90-degree rotations). To increase tension (if the door is heavy), the spring is wound clockwise. To decrease tension (if the door is too light), it’s unwound counter-clockwise. A common rule of thumb is 1 turn for every foot of door height. For a 7-foot door, this might mean 7.75 turns, or 31 quarter turns.
- Tighten Set Screws: Once the desired tension is achieved, the set screws are carefully and securely tightened.
- Stretch the Spring: For proper tension, the spring might also need to be stretched slightly (e.g., 1/4 inch) before the set screws are fully tightened.
- Test and Rebalance: After adjustments, the door is tested for balance, and further fine-tuning may be necessary.
This process highlights the complexity and danger involved. Torsion springs typically last for 15,000 to 20,000 cycles, while extension springs last around 10,000 cycles. You can learn more about how long garage door springs typically last in our comprehensive guide.
The Dangers of DIY: When to Call a Professional
We’ve touched on it throughout this guide, but it bears repeating: DIY garage door spring tension adjustment, especially for torsion springs, is incredibly risky. The statistics are sobering: an estimated 30,000 people are injured by garage doors each year, and many of these incidents are directly related to spring failures or improper handling. Over 30 people die annually from garage door accidents, underscoring the severity of these repairs.
Why the High Risk?
- Immense Stored Energy: Garage door springs are designed to lift hundreds of pounds. They store an incredible amount of kinetic energy. When this energy is suddenly and uncontrollably released (e.g., if a winding bar slips, a spring snaps, or a component breaks during adjustment), it can cause severe injuries like broken bones, lacerations, concussions, or even death.
- Specialized Tools and Expertise: As discussed, specialized winding bars are needed for torsion springs. Using inadequate tools is a recipe for disaster. Furthermore, understanding the precise number of turns, the correct spring type for your door’s weight, and how to balance the system requires professional training and experience.
- Consequences of Improper Adjustment: Even if you avoid immediate injury, incorrect garage door spring tension can lead to:
- Premature wear: Over-tensioning can wear springs by 50%, while under-tensioning strains the opener and other components.
- System imbalance: Leading to crooked door movement, track damage, or cables coming off pulleys.
- Property damage: An unbalanced door can crash onto vehicles or other property.
- Opener failure: The garage door opener is not designed to lift the full weight of the door; it’s there to guide it. Improper spring tension forces the opener to work overtime, leading to early failure and costly replacement.
Signs You Absolutely Need a Pro
While we encourage homeowners to perform regular maintenance checks, there are definite red flags that signal it’s time to call in the experts.
- Broken Spring: If you see a visible gap in your torsion spring coils, or your extension spring is dangling uselessly, it’s broken. Do not attempt to move the door, and definitely do not try to replace or adjust it yourself. This is the most common reason for professional service.
- Visible Rust or Wear: Springs showing significant rust, pitting, or deformation are weakened and prone to breaking. A well-maintained spring system reduces risks by 60%, but once corrosion sets in, it’s time for replacement.
- Failed Balance Test: If your door consistently fails the balance test (falls or shoots up), and you’re not comfortable with the intricate and dangerous adjustment process, a professional is your safest bet.
- Loud Bang: A sudden, very loud noise from the garage often indicates a spring has snapped.
- Uncomfortable with the Task: If you feel any hesitation, uncertainty, or fear about working with your garage door springs, trust your instincts. Your safety is worth more than a DIY attempt.
At AA Garage Door Repair Services, we specialize in safe and efficient spring repair and replacement in St. Paul, the Twin Cities, MN, and Western WI. Our technicians are trained to handle these high-tension components with the utmost care. For why you should hire a professional for spring replacement, we’ve outlined the key reasons in another article.
Frequently Asked Questions about Garage Door Spring Tension
We often hear similar questions from homeowners about their garage door springs. Here are some of the most common ones we address:
How often should I check my garage door’s balance?
We recommend checking your garage door’s balance at least twice a year. Ideally, you should do this with the changing seasons, as temperature fluctuations can affect the metal components and garage door spring tension. Manufacturers like Amarr recommend monthly checks of the entire garage door system. Regular checks can add 30-50% to your spring’s life and help you catch issues before they become major problems. Pairing this check with other seasonal home maintenance tasks is a great way to remember.
Can I use any metal rod to adjust my torsion springs?
Absolutely not. This is a critical safety point. You must use proper steel winding bars designed specifically for garage door torsion springs. These bars are engineered to withstand the immense torque exerted during winding and unwinding. Using substitutes like screwdrivers, rebar, or even pipe wrenches is extremely dangerous. These improvised tools can bend, snap, or slip out of the winding cone, causing severe injury to anyone nearby. A professional technician will always use the correct tools for the job to ensure safety.
Should I replace both springs if only one is broken?
Yes, in almost all cases, we strongly recommend replacing both torsion springs if one breaks, even if the other appears fine. Here’s why: Garage door springs are installed at the same time and designed for a specific number of cycles (e.g., 10,000 or 15,000 cycles). If one spring has reached the end of its lifespan and broken, it’s highly probable the other spring is not far behind. Replacing both ensures:
- Balanced Operation: A new spring paired with an old, fatigued spring will lead to an unbalanced system, putting undue stress on the newer spring and the garage door opener.
- Even Wear: Both springs will then wear out at roughly the same rate, preventing another spring break shortly after the first repair.
- Cost-Effectiveness: Often, the labor cost for replacing one spring versus two is not significantly different, making it more economical in the long run to do both at once.
Keep Your Door Running Smoothly and Safely
Understanding garage door spring tension is key to maintaining a safe, efficient, and long-lasting garage door system. The springs are the workhorses, doing the heavy lifting and ensuring your door operates smoothly and safely. While routine checks like the balance test are valuable for homeowners, the actual adjustment or replacement of these high-tension components is best left to trained professionals.
Safety always comes first. Ignoring signs of improper tension or attempting dangerous DIY repairs can lead to serious injury, costly damage, and unnecessary stress. A well-maintained spring system significantly reduces risks, sometimes by as much as 60%.
At AA Garage Door Repair Services, we’ve been serving the communities of St. Paul, the Twin Cities, MN, and Western WI since 2001. We pride ourselves on fast, reliable 24/7 emergency service, transparent pricing, and a satisfaction guarantee. Our local expertise means we understand the unique needs of garage doors in our climate.
If you suspect your garage door spring tension is off, if your door is sagging, making strange noises, or simply not performing as it should, don’t hesitate. For expert help in the Twin Cities, a Minneapolis garage spring repair guide can provide local insights, but the best first step is to contact us.
We’re here to ensure your garage door operates smoothly and safely for years to come. Give us a call today for a professional inspection or to schedule professional garage door maintenance.
Call us at (651) 702-1420 – your trusted local garage door experts.