Why Garage Door Opener Programming Matters
Garage door opener programming is the process of syncing your remote controls, keypads, and in-car systems to your garage door’s motor unit so they can communicate and operate your door. Here’s the quick version:
Basic Programming Steps:
- Locate the “Learn” or “Program” button on your garage door opener motor unit
- Press and release the button (LED indicator will light up for 30 seconds)
- Press and hold the button on your remote or enter your PIN on the keypad
- Wait for the opener’s light to blink or click, confirming successful programming
- Test your newly programmed device
The process typically takes less than 60 seconds per device, and most openers can support up to 6 remotes.
There’s an argument to be made that there’s nothing more convenient than a garage door remote. Right? But whether you’ve just moved into a new home, lost a remote, or need to add a new device for a family member, understanding how to program your garage door opener saves time and improves your home’s security. For homeowners in the Twin Cities who prefer professional service, our team at AA Garage Door provides reliable installation and repair support.
Programming isn’t just about convenience—it’s essential for maintaining control over who has access to your home. Modern remotes with rolling code technology, like Security+ 2.0 or Intellicode systems, change the access code each use, making unauthorized entry nearly impossible. When a remote is lost or stolen, knowing how to clear old codes and reprogram your system becomes a critical security skill.
This guide walks you through programming remotes, keypads, and car-based systems like HomeLink, plus troubleshooting tips when things don’t go as planned. Most modern garage door openers from brands like LiftMaster, Chamberlain, Genie, and Overhead Door follow similar programming procedures, though specific button colors and timing may vary.
I’m David Sands, owner of AA Garage Door LLC, and over 23 years I’ve helped thousands of homeowners across Wisconsin and Minnesota with garage door opener programming, installations, and emergency repairs. As an authorized LiftMaster dealer and IDA member, I’ve programmed everything from basic chain-drive openers to advanced Wi-Fi-enabled systems with smartphone integration.
, 3. Press remote button or enter keypad PIN, 4. Wait for confirmation light/click, 5. Test the device - garage door opener programming infographic infographic-line-5-steps-dark")
Garage door opener programming terms made easy:
Before You Begin: Understanding Your System
Before you start garage door opener programming, let’s take a moment to understand what you’re actually working with. Think of your garage door system like a small team where every member has a specific job. When they all work together, your door opens and closes smoothly. When one member doesn’t know the game plan—like an unprogrammed remote—nothing happens.
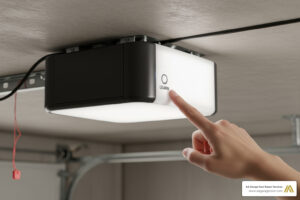
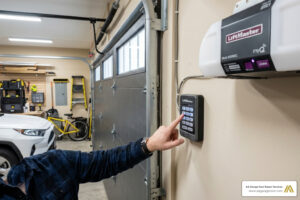
Your garage door opener system has four essential components. The motor unit hangs from your ceiling and acts as the brain of the operation, housing the motor, the receiver that picks up signals from your remote, and that all-important “Learn” button we’ll be using. Your remote control (or transmitter) is the handheld device that sends radio signals to tell the motor unit what to do. The wall console is that push-button panel mounted inside your garage, usually near the door leading into your house, which provides a wired connection and often includes a lock feature. Finally, the safety sensors sit near the bottom of your door tracks on either side, creating an invisible beam that prevents the door from closing if something breaks the signal—a crucial safety feature that’s saved countless toys, pets, and even people from getting crushed.
Understanding these components makes troubleshooting easier and helps you communicate clearly with professionals if you need garage door services down the line.
So why might you need to program or reprogram your opener in the first place? The most common reason is a lost or stolen remote—you’ll want to erase that old code immediately and program a new one to keep your home secure. Maybe you’ve picked up a new remote or keypad so another family member can get in, or you want the convenience of keyless entry. Sometimes a power outage or replacing the backup battery can wipe your opener’s memory clean, forcing you to reprogram everything. You might also need a security reset if you suspect someone has unauthorized access, or you’re simply dealing with a device malfunction that reprogramming might fix.
The good news? You won’t need a toolbox full of fancy equipment. A sturdy ladder to reach your ceiling-mounted motor unit is essential—please don’t try standing on paint cans or wobbly chairs. Your owner’s manual is your best friend here; while we’ll give you general steps that work for most systems, your specific model might have quirks only the manual covers. And make sure you have new batteries on hand for your remotes and keypads. Weak batteries are one of the most common reasons programming fails, and it’s frustrating to troubleshoot for twenty minutes only to realize you just needed fresh AAs.
Here’s something worth knowing: the technology behind your opener matters. Newer systems use rolling code technology, where the access code automatically changes every single time you use it. This makes your garage significantly more secure because even if someone intercepts your signal, it’s useless after one use. Older models might use fixed codes set by tiny DIP switches inside both the remote and opener that have to match exactly. If you’re curious about how different motor types work, you can explore more about garage door motors.
Identifying Your Opener’s “Learn” Button
The “Learn” button is your ticket to successful garage door opener programming. This small but mighty button—sometimes labeled “Program” or “Smart”—puts your opener into a receptive mode where it’s ready to accept new devices. Without finding this button, you’re stuck at square one.

Most of the time, you’ll find the Learn button on the back or side panel of your motor unit. It’s usually pretty visible, but sometimes manufacturers hide it under the light cover. Don’t be afraid to pop that cover off—just make sure the opener is cool first if it’s been running recently.
Here’s a helpful tip: the button color actually tells you something about your opener’s age and technology. A purple Learn button typically means you have a newer LiftMaster or Chamberlain model. A red or orange button usually indicates an older LiftMaster, Chamberlain, or Craftsman opener. If you see a green button, you’re likely looking at an older LiftMaster or Chamberlain unit. A yellow button is common on recent LiftMaster and Chamberlain Security+ 2.0 models, which use advanced rolling code technology.
Why does this matter? Different button colors sometimes correspond to different programming procedures or timing requirements. Your manual will have the specifics, but knowing your button color can help you find the right instructions faster.
Once you’ve located this little button, you’re ready to start programming. The actual process is surprisingly simple—the hard part was finding the button in the first place!
The Core Guide to Garage Door Opener Programming
Now that you understand your system, let’s get into the actual garage door opener programming process. While specific brands might have slight variations, most modern openers from LiftMaster, Chamberlain, Genie, and others follow remarkably similar steps. Think of this as your universal guide—though we always recommend keeping your owner’s manual handy for those model-specific quirks.
Here’s some good news: whether you’re programming one remote or six, the process stays exactly the same. You simply repeat the steps for each device. Most garage door openers can support up to six remotes, which means everyone in the family can have their own access without any complicated workarounds.
How to Program a Standard Garage Door Remote
Programming a standard remote is usually the easiest task in the garage door world. I’ve seen homeowners complete this in under a minute once they know where their “Learn” button lives.
Start by locating the “Learn” button on your garage door opener’s motor unit. Yes, you’ll probably need that ladder we mentioned earlier. Once you’ve found it, press and release the button quickly. Don’t hold it down—just a quick tap will do. You should see an LED indicator light come on, often blinking steadily. This is your opener saying, “Okay, I’m listening!”
Here’s where timing matters: you typically have a 30-second window to complete the next step before the opener stops listening and returns to normal operation. Within those 30 seconds, grab your remote and press the button you want to program. Hold it down—don’t just tap it. Keep holding until you see the opener’s light blink or hear an audible click. That’s your confirmation that the two devices have successfully introduced themselves to each other.
Now for the moment of truth: test your remote. Step back from the door, press the newly programmed button, and watch your garage door respond like magic. If nothing happens, don’t worry—just repeat the process, making sure you’re holding that remote button long enough for the opener to catch the signal.
If you’re curious about the mechanics behind your opener, our guide to different opener types explains how chain-drive and belt-drive systems differ in operation.

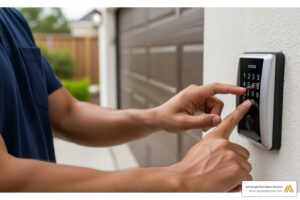
How to Program a Wireless Garage Door Keypad
A wireless keypad transforms your garage access experience. No more hiding keys under flowerpots or worrying about lost remotes when you’re out for a morning jog. Programming one is just as straightforward as a remote, with one extra step.
Begin by locating and pressing the “Learn” button on your motor unit—the same one you’d use for a remote. That LED indicator will light up, giving you your standard 30-second programming window. Now the fun part: head to your keypad and enter your desired PIN. Choose something memorable but not obvious (your birthday might not be the best choice for security reasons). Most keypads accept four-digit codes, though some models support longer ones.
If you’re setting up a brand-new keypad fresh from the box, you might need to enter a default PIN first before creating your custom code—check your keypad’s instructions for this detail. Once you’ve entered your chosen PIN, press the “Enter” or “Program” button on the keypad. Watch for the opener’s lights to blink—that’s your success signal.
Always test the new PIN before considering the job done. Enter your code, press “Enter,” and verify that your garage door operates smoothly. There’s nothing more frustrating than finding a programming glitch when you’re locked out in the rain!
For everything you ever wanted to know about keypads—including advanced features like temporary guest codes and troubleshooting sticky buttons—check out our comprehensive Garage Door Opener Keypad Complete Guide.

How to Program Your Car’s HomeLink® System
Programming your car’s HomeLink® system might sound intimidating, but it’s genuinely one of the most convenient upgrades you can make to your daily routine. Imagine pulling up to your garage without fumbling for a remote—just press a button on your sun visor or overhead console. Let’s make that happen.
Start with preparation: park your car facing the garage door with the engine running or the key in the ignition (some cars require this for power). Grab your existing garage door remote and make sure it has a fresh battery—a weak signal here will cause nothing but headaches.
If this is your first time programming HomeLink or you want to start fresh, you’ll need to clear the system’s memory. Press and hold the two outer HomeLink buttons simultaneously (usually buttons 1 and 3). Keep holding them—it might feel like forever, but it can take up to 20 seconds—until the HomeLink indicator light begins flashing rapidly. Once it does, release both buttons. Your HomeLink is now ready for new programming.
Now comes the pairing process. Choose which HomeLink button you want to program. Position your garage door remote about 2 to 5 inches away from that button—distance matters here because the signal needs to transfer clearly. Press and hold both the HomeLink button and your remote’s button at the same time. Keep holding until the HomeLink indicator light changes from a slow, lazy blink to a rapid flash. This means HomeLink has successfully learned your remote’s code. You can release both buttons now.
Here’s where modern security technology adds one more step. If your opener uses rolling code technology—and most modern systems like LiftMaster’s Security+ 2.0 or Genie’s Intellicode do—you’ll need to complete what’s called a “training” process. Walk over to your garage door opener’s motor unit and press the “Learn” button. You’ve got about 30 seconds to hustle back to your car for the next step.
Back in your vehicle, press and hold the newly programmed HomeLink button for about two seconds, then release. Repeat this press-and-release sequence two or three more times until your garage door responds by opening or closing. This synchronizes the rolling code between your car and opener, ensuring secure operation every time.
Finally, test the system by pressing your programmed HomeLink button. Your garage door should operate smoothly. If it doesn’t respond, your vehicle’s owner’s manual will have specific HomeLink instructions for your make and model. You can also find detailed programming guidance for various systems on manufacturer websites like Overhead Door.

Troubleshooting Unsuccessful Programming
You’ve followed every step carefully, pressed all the right buttons, but your garage door opener still won’t sync with your remote. Frustrating, right? Don’t worry—this happens more often than you’d think, and we’ve seen it all in our 23 years of service. Programming can fail for several reasons: signal interference from nearby electronics, compatibility mismatches between your remote and opener, or even a full memory. Here’s something most homeowners don’t realize: most modern garage door openers can support up to 6 remotes. If you’re trying to add a seventh device, that’s likely your issue right there.
The good news? Most programming problems have simple solutions that don’t require a service call. Let’s walk through the most common roadblocks to successful garage door opener programming and how to fix them.
Common Issues and Quick Fixes
Over the years, we’ve helped thousands of homeowners troubleshoot programming issues. Here are the problems we encounter most frequently and the fixes that work:
Weak or Dead Batteries: This is the number one culprit. Even if your remote worked yesterday, a dying battery can prevent successful programming. Swap in fresh batteries before trying anything else—it solves the problem about half the time. For more detailed guidance, check our guide to garage door opener batteries.
Opener Light Doesn’t Blink: If you press the “Learn” button and nothing happens, first check that your opener has power. Look for a reset button on the unit that might have been tripped. If the light still won’t respond, the circuit board may need replacement—that’s when you’ll want to call us for expert garage door opener repair.
Wrong Frequency or Compatibility Issues: Not all remotes work with all openers. Older fixed-code systems and newer rolling-code systems speak different languages. If you’re using a universal remote, verify it’s compatible with your specific opener brand and model. LiftMaster remotes won’t program to Genie openers, and vice versa, unless you’re using a truly universal model.
Opener Memory is Full: 6-remote limit we mentioned? If you’ve programmed the maximum number of devices, you’ll need to clear at least one before adding another. We’ll show you how to do that in the next section.
Signal Interference: Large metal objects, electronic devices, or even LED light bulbs can interfere with your remote’s signal. Try moving closer to the opener during programming—within 5 feet is ideal. If you have a newer LED bulb in your opener, it might be causing interference; switching to an incandescent or garage-door-rated LED often solves the problem.
Safety Sensor Misalignment: While this doesn’t directly affect programming, misaligned sensors can prevent your door from operating even after successful programming, making you think the programming failed. Check that both sensors near the floor have solid green or red lights and are facing each other properly.
Timing Issues: That 30-second programming window moves faster than you think, especially if you’re climbing a ladder. Practice the sequence a few times before pressing the “Learn” button. Have your remote ready in your hand, batteries fresh, and know exactly which button you’re pressing.
If you’ve tried these fixes and your remote still won’t program, there may be a deeper issue with your opener’s receiver board or antenna. That’s when professional help makes sense—and we’re available 24/7 for emergencies.
How to Clear and Reset Your Garage Door Opener
Sometimes the best solution is to start fresh. Erasing all programmed codes from your opener’s memory is a smart security measure when you move into a new home, lose a remote, or suspect someone has unauthorized access to your garage.
Here’s how to perform a complete reset on most garage door openers:
Locate the “Learn” button on your motor unit—the same button you use for programming. Press and hold this button for 6 to 10 seconds. Don’t just tap it; you need a firm, continuous press. The LED indicator light will stay on at first, then turn off completely when the memory has been cleared. Some models will blink rapidly before going dark.
Once the light turns off, all previously programmed remotes, keypads, and car systems have been erased. Your wall-mounted push button will still work since it’s hardwired, but everything wireless is now disconnected from your system.
Now you’ll need to reprogram all your devices using the steps we covered earlier in this guide. It’s a bit of a hassle if you have multiple remotes and a keypad, but it ensures complete security. Think of it like changing all the locks on your house—a fresh start with full control over access.
When should you consider calling a professional instead of troubleshooting yourself? If your opener’s motor unit doesn’t respond at all, if the circuit board shows visible damage, if you smell burning electronics, or if you’re simply not comfortable working on a ladder near electrical components, we’re here to help. Our team provides reliable garage door services throughout the Twin Cities, and we can diagnose and fix programming issues quickly, often on the same day you call.