Understanding How to Sync a Garage Remote
How to sync a garage remote takes less than two minutes on most modern openers. Here’s the quick version:
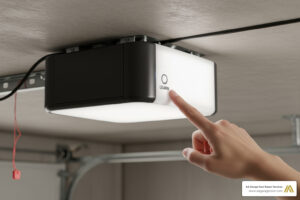
- Locate the Learn button on your garage door opener motor unit (usually on the back or side).
- Press and release the Learn button — the LED light will glow for 30 seconds.
- Press and hold the button on your remote within those 30 seconds.
- Release when the opener’s lights blink or you hear two clicks.
- Test the remote from a normal distance.
That’s it for most standard openers. The sections below cover brand-specific steps, car integration, keypads, and troubleshooting if it doesn’t work first try.
If you’ve ever pulled into your driveway after a long day only to find your garage remote has stopped working — or you just bought a new one and aren’t sure how to pair it — you’re not alone. For fast, reliable help with opener issues, homeowners trust garage door repair and opener service experts. With over 100 million garage doors in use across the United States, syncing issues are one of the most common calls our team receives at AA Garage Door Repair Services.
The good news? For most homeowners in the Twin Cities and beyond, this is a straightforward DIY fix that requires no special tools.
I’m David Sands, owner of AA Garage Door LLC, and over the past 23 years I’ve helped thousands of homeowners how to sync a garage remote quickly and correctly — from basic LiftMaster remotes to car-integrated HomeLink systems. Let’s walk through everything you need to know.

Before you climb that ladder, it helps to understand the “magic” happening behind the scenes. Your garage door system is essentially a conversation between two devices: a transmitter (your remote) and a receiver (the motor unit on your ceiling).
Modern systems rely on specific radio frequencies to communicate. To keep your home secure, most openers manufactured after 1993 use rolling code technology. This means the access code changes every single time you press the button, preventing tech-savvy intruders from “grabbing” your code from the airwaves.

When you learn how to sync a garage remote, you are essentially introducing the remote’s unique digital signature to the opener’s memory. The receiver unit, located inside the box mounted to your ceiling, must be told to listen for your specific remote’s frequency.
At AA Garage Door Repair Services, we see a wide variety of Garage Door Remotes in the Twin Cities area, ranging from basic single-button clickers to multi-function transmitters that control lights and multiple doors. Regardless of the style, the fundamental process of matching the radio frequency remains the same. For a deeper look at the mechanics, you can check out this guide on how to program a garage door opener.
General Steps to Program Your Garage Door Remote
While every brand has its quirks, 90% of modern openers follow a “Universal” logic centered around the Learn button. This button is your gateway to the system’s brain.
Step 1: Access the Opener
You will need a sturdy stepladder to reach the motor unit. Safety first—make sure the ladder is on level ground. You may need to remove a plastic light cover to see the control panel.
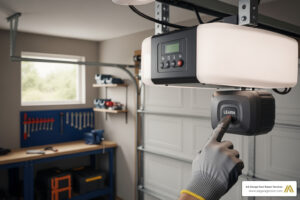
Step 2: Locate the Learn Button
Look for a small, brightly colored button (often square or round). It might be yellow, purple, red, orange, or green. The color is actually a code for the frequency the machine uses.
Step 3: Activate Programming Mode
Press and release the Learn button. Do not hold it down for too long (holding it for 6+ seconds usually wipes the entire memory, which means your other remotes will stop working!). Once pressed, an indicator LED will glow steadily. This opens a 30-second window for you to complete the sync.
Step 4: Sync the Remote
Within that 30-second window, press the button on your handheld remote. Most professionals recommend holding it for about two to three seconds.
Step 5: Confirm Success
The opener will let you know it heard the remote. Usually, the light bulbs on the motor unit will flash, or you will hear two distinct clicks. Once you see or hear this, the sync is complete.

For a visual walkthrough, this Garage Door Opener Programming Guide offers excellent detail, and you can also watch this video on how to program a garage door opener remote to see the timing in action.
How to Sync a Garage Remote for Specific Brands
Different manufacturers have slight variations in their programming sequences. Here is how to handle the “Big Three” brands we often service in St. Paul and Woodbury.
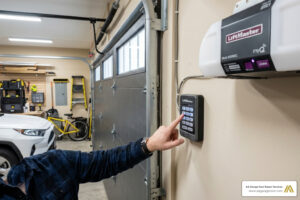
- LiftMaster / Chamberlain / Craftsman: These brands are often interchangeable. Look for the colored Learn button. If you have a “MyQ” enabled system, you can also sync via a smartphone app. For a detailed brand-specific walkthrough, see this guide on how to Sync Remote To Liftmaster Garage Door Opener.
- Genie: Many Genie models use a “Program/Set” button. You press and hold it until the light turns blue, then release. The light will then flash purple, at which point you press your remote button twice.
- Overhead Door: These often use “CodeDodger” technology. The process is similar to Genie; you’ll find the programming button on the motor head, often behind the light lens.
If you are moving into a new home or have lost a remote, it is a great idea to consider changing the garage door opener code entirely to ensure previous owners or unauthorized persons can’t gain access.
How to Sync a Garage Remote to Your Car
Modern convenience means you don’t always need a plastic remote clipped to your visor. With over 42.4 million Ford vehicles on US roads—and millions more from GM, Toyota, and Honda—most cars now feature built-in systems like HomeLink or Car2U.
To sync your car’s built-in buttons:
- Clear old codes: In most cars, hold the two outer buttons on your mirror or overhead console until the light flashes rapidly.
- Pair the remote to the car: Hold your handheld remote 1-3 inches away from the car’s buttons. Press both the handheld remote button and the car button you want to use simultaneously. Hold until the car’s indicator light changes from a slow to a rapid flash.
- Bridge to the motor: Now, go to the garage motor and press the “Learn” button.
- Confirm in the car: Return to the vehicle and firmly press the programmed button in your car two times (holding for two seconds each time).
If you’re struggling with car integration in the Twin Cities south metro, our experts providing garage door repair in Apple Valley can help you get your vehicle synced in minutes. You can also find more advanced methods in this guide on how to sync remote garage door opener in 06 methods.
Troubleshooting and Advanced Programming Scenarios
Sometimes, you follow the steps perfectly and… nothing happens. Don’t worry; it’s usually a simple fix.
1. Battery Issues This is the “is it plugged in?” of the garage door world. Even if the little light on your remote turns on, the battery might be too weak to send a strong enough signal to the receiver. Replace the battery first—it’s the cheapest fix.
2. Signal Interference LED light bulbs are notorious for causing radio frequency interference. If you recently installed LED bulbs in your garage opener, they might be “jamming” the remote’s signal. Try unscrewing the bulbs and syncing again.
3. Memory is Full Most openers can only hold about 5 to 10 remotes/keypads in their memory. If you’ve lived in your house a long time, the memory might be full. You’ll need to learn how to reprogram garage door opener systems by holding the Learn button for 6 seconds to wipe the memory, then re-syncing all your devices from scratch.
4. Broken Hardware If the motor unit doesn’t blink or click when you press the Learn button, the logic board might be fried. In these cases, a full garage door replacement or a new motor installation might be necessary.
Safety Precautions and Maintenance Tips
A garage door is the largest moving object in your home. When you are learning how to sync a garage remote, please keep these safety tips in mind:
- Clear the Path: Ensure no children, pets, or vehicles are under the door while you are testing your sync.
- Ladder Safety: Never overreach while on the ladder. If the opener is hard to reach, have a second person hold the ladder steady.
- Check the Sensors: While you’re up there, take a look at your IR safety sensors (the “eyes” at the bottom of the tracks). If they are misaligned, the door won’t close, even if your remote is perfectly synced.
- Maintenance Matters: We recommend testing your remotes and checking battery levels every 6–12 months.
Understanding the full scope of your system is easy with our Garage Door Opener Remote Complete Guide. With over 145 million housing units in the US, and four out of five having a garage, staying on top of this simple maintenance keeps your home secure and functional.
Frequently Asked Questions about Garage Remote Syncing
How many remotes can I sync to one opener?
Most modern residential openers can handle between 5 and 12 devices. This includes handheld remotes, wireless keypads, and your car’s HomeLink buttons. If you hit the limit, the opener will simply stop accepting new “syncs” until you clear the memory.
Why does my garage remote lose its sync?
The most common culprits are a dying battery or a recent power surge. Sometimes, a long power outage can cause the opener to “forget” certain frequencies. RF interference from nearby electronics (like a neighbor’s new security system) can also cause intermittent sync loss.
Can I sync a remote to an older opener without a Learn button?
Yes, but the process is different. Openers made before 1993 often use DIP switches—small rows of switches numbered 1-9. You have to manually match the pattern of switches on the remote to the pattern on the back of the motor. If your remote doesn’t have switches and your motor doesn’t have a Learn button, they are likely incompatible.
Conclusion
Learning how to sync a garage remote is a skill every homeowner should have in their back pocket. It saves time, money, and the frustration of being locked out in the Minnesota snow or Wisconsin rain. Whether you’re in St. Paul, Baldwin, Woodbury, or Hudson, most syncing jobs are a quick 5-minute task.
However, we know that technology can be a headache. If you’ve tried the steps above and your door still won’t budge, or if you suspect your motor unit has seen better days, we are here to help. At AA Garage Door Repair Services, we’ve been the Twin Cities’ local experts since 2001. We offer 24/7 emergency support and a satisfaction guarantee on all garage door openers.
Don’t let a stubborn remote ruin your day. For expert assistance or to schedule a professional tune-up, contact our team today. We’ll get your door moving so you can get on with your life!