When Your Garage Door Won’t Fully Open or Close, the Fix Is Often This Simple
A garage door limit adjustment is one of the most common — and most overlooked — fixes for a door that stops short of the floor, reverses unexpectedly, or refuses to open all the way. Before you call for professional garage door repair services in the Twin Cities, this is the first thing to check.
Here’s the quick answer:
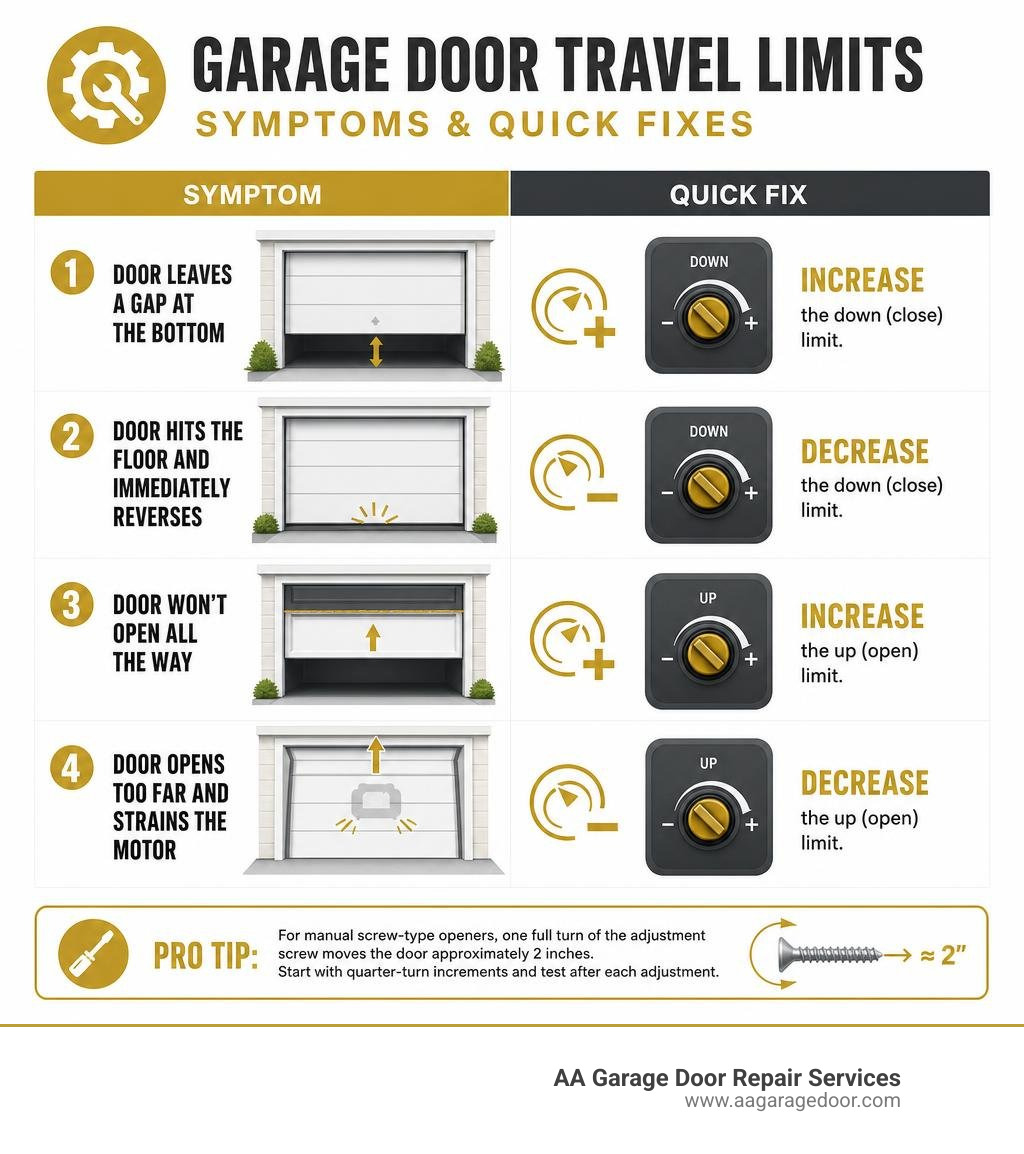
- Door leaves a gap at the bottom? Your down (close) limit is set too low — increase it.
- Door hits the floor and immediately reverses? Your down limit is set too far — decrease it.
- Door won’t open all the way? Your up (open) limit needs to be increased.
- Door opens too far and strains the motor? Your up limit is set too high — decrease it.
For manual screw-type openers, one full turn of the adjustment screw moves the door approximately 2 inches. Start with quarter-turn increments and test after each adjustment.
Most homeowners assume a door that won’t close properly has a broken spring or a failing motor. In reality, the culprit is often a simple calibration issue inside the opener unit itself — a setting that drifted slightly due to a power outage, a temperature swing, or years of normal vibration.
The stakes are real. The U.S. Consumer Product Safety Commission reports an average of 20,000 garage door-related injuries per year. A door with incorrectly set limits can fail to reverse when it should — putting children, pets, and property at serious risk.
If you’re in the Twin Cities and need expert help fast, our team at AA Garage Door is available 24/7.
I’m David Sands, owner of AA Garage Door LLC, an authorized LiftMaster dealer with over 23 years of hands-on experience diagnosing and correcting garage door limit adjustment issues across Wisconsin and Minnesota. In this guide, I’ll walk you through exactly how to identify the problem, adjust your limits safely, and test your door’s safety reversal system — whether you have an older screw-drive opener or a modern digital model.
Simple garage door limit adjustment glossary:
What Are Travel Limits and Why Do They Drift?
To understand how a garage door limit adjustment works, you first have to understand what “travel limits” actually are. Simply put, travel limits are the programmed boundaries that tell your garage door opener when to stop running. Your opener has two primary limits: the UP (open) limit and the DOWN (close) limit.
Think of your garage door opener as having an internal position counter—almost like a digital tape measure that counts from 0 (fully closed) to 100 (fully open). When you activate the door, the motor tracks its position along this scale. If everything is calibrated correctly, the motor stops precisely when the door reaches the floor (0) or clears the header (100).
However, this internal counter can get “lost” or drift over time. There are three main reasons why this happens:
- The Emergency Release Mismatch: When you pull the red emergency release cord to open your door manually during a power outage, you disconnect the physical door from the opener carriage. If you manually move the door and then re-engage the trolley at a different position, the opener’s internal counter no longer aligns with the door’s actual physical position.
- Vibration and Wear: Over years of daily operation, the constant, heavy vibration of the motor can slowly turn physical adjustment screws or cause minor electronic drift on the circuit board.
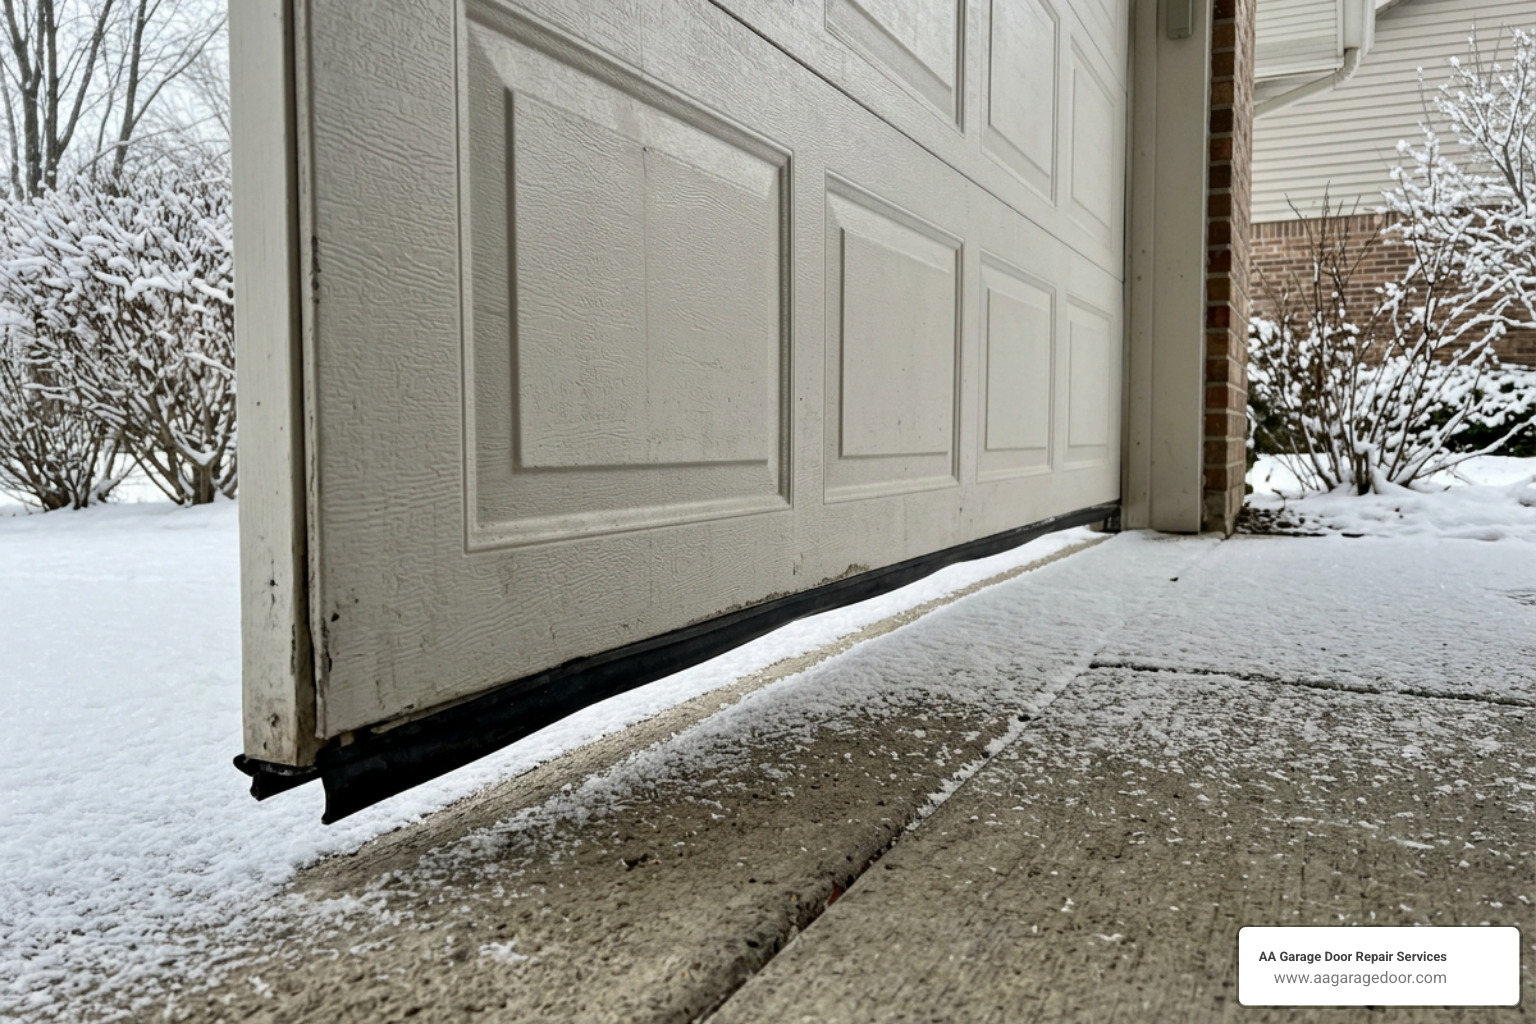
- Seasonal Temperature Swings: This is the most common culprit for homeowners in our region.
If your door is acting possessed—perhaps stopping midway or refusing to stay closed—it is highly likely that your limits are out of sync. For a broader look at this issue, you can read our guide on Why Your Garage Door Opens or Closes by Itself.
The Mechanics of a Garage Door Limit Adjustment
Mechanically, older garage door openers rely on physical limit switches. These switches are typically located inside the motor housing or along the rail assembly. As the trolley travels along the rail, it physically contacts a metal or plastic lever (the limit switch), which cuts power to the motor.
On screw-drive or chain-drive models, these switches are often controlled by plastic gears and contact plates inside the motor head. Turning the external adjustment screws physically moves these contact plates closer together or further apart.
Modern smart openers have replaced these mechanical contacts with digital encoders. The encoder counts the exact rotations of the motor shaft to determine the door’s location. When you program a modern digital opener, you are saving these electronic coordinates directly to the logic board. To learn more about how these assemblies function, check out the technical breakdown of a Garage Door Limit Switch: How to Adjust and Fix It – XURUI.
Why Temperature Extremes Cause Limit Drift
In Saint Paul, MN, Woodbury, MN, Baldwin, WI, and Hudson, WI, we experience some of the most extreme temperature swings in the country. We go from sub-zero winter freezes to humid, 90-degree summer afternoons.
These massive temperature shifts cause the steel tracks, the metal door panels, and the wooden framing of your garage to expand and contract. In fact, these temperature extremes can shift the effective travel distance of a garage door by up to half an inch (0.5 inches) in each direction.
When freezing winter temperatures contract the metal tracks and the ground freezes and rises slightly, a down limit that was perfectly set in July may suddenly be “too long” in January. The door hits the frozen ground before reaching its programmed limit, registers the floor as an obstruction, and reverses back open. Conversely, in the summer, the metal expands, which can leave a small gap at the bottom of the door, allowing pests and warm air inside.
Because of this environmental reality, most homeowners in our service areas need to adjust their down travel limits by one to two quarter-turns between seasons to maintain a perfect seal. If you are experiencing major alignment issues in the south metro, you can explore our specialized Apple Valley Garage Door Services to get a technician out to calibrate your system.
Travel Limits vs. Force Settings: What is the Difference?
One of the most common—and dangerous—mistakes DIYers make is confusing travel limits with force settings. These are two entirely different systems, and mixing them up can ruin your opener or create a severe safety hazard.
- Travel Limits control the distance the door travels. They dictate the exact physical points where the door must start and stop.
- Force Settings control the amount of power (measured in pounds of resistance) the motor is allowed to exert to get the door to those points.
If your door stops short because it is physically binding on a warped track, increasing the force settings to “push through” the problem is a terrible idea. Doing so forces the motor to exert excessive power, which can strip gears, bend the door panels, or fail to reverse if a person or pet gets caught underneath.
| Feature | Travel Limits | Force Settings |
|---|---|---|
| What it controls | Physical stopping positions (UP and DOWN) | Motor power/effort level |
| Adjustment type | Screws (older) or digital menus (modern) | Separate dials (older) or auto-calibrated (modern) |
| When to adjust | Door leaves a gap or reverses at the floor | Door struggles to lift or reverses mid-travel without hitting the floor |
| Safety impact | Prevents physical damage to header and floor | Determines sensitivity of the auto-reverse safety system |
A properly adjusted opener should reverse when it encounters approximately 15 pounds of resistance during its closing cycle. If your door is reversing unexpectedly and you aren’t sure whether it’s a limit or force issue, read our comprehensive Garage Door Not Closing Guide for a step-by-step diagnostic checklist.
Step-by-Step Guide to Manual and Digital Adjustments
Before making any adjustments, you must identify whether your opener uses manual adjustment screws (older models) or digital programming buttons (modern models).
Always check your tracks for physical obstructions, ensure your photo-eye safety sensors are clean and aligned, and verify that your door is physically balanced before touching the opener settings. For a complete overview of opener setup, refer to our Garage Door Opener Programming Guide.
How to Perform a Manual Garage Door Limit Adjustment
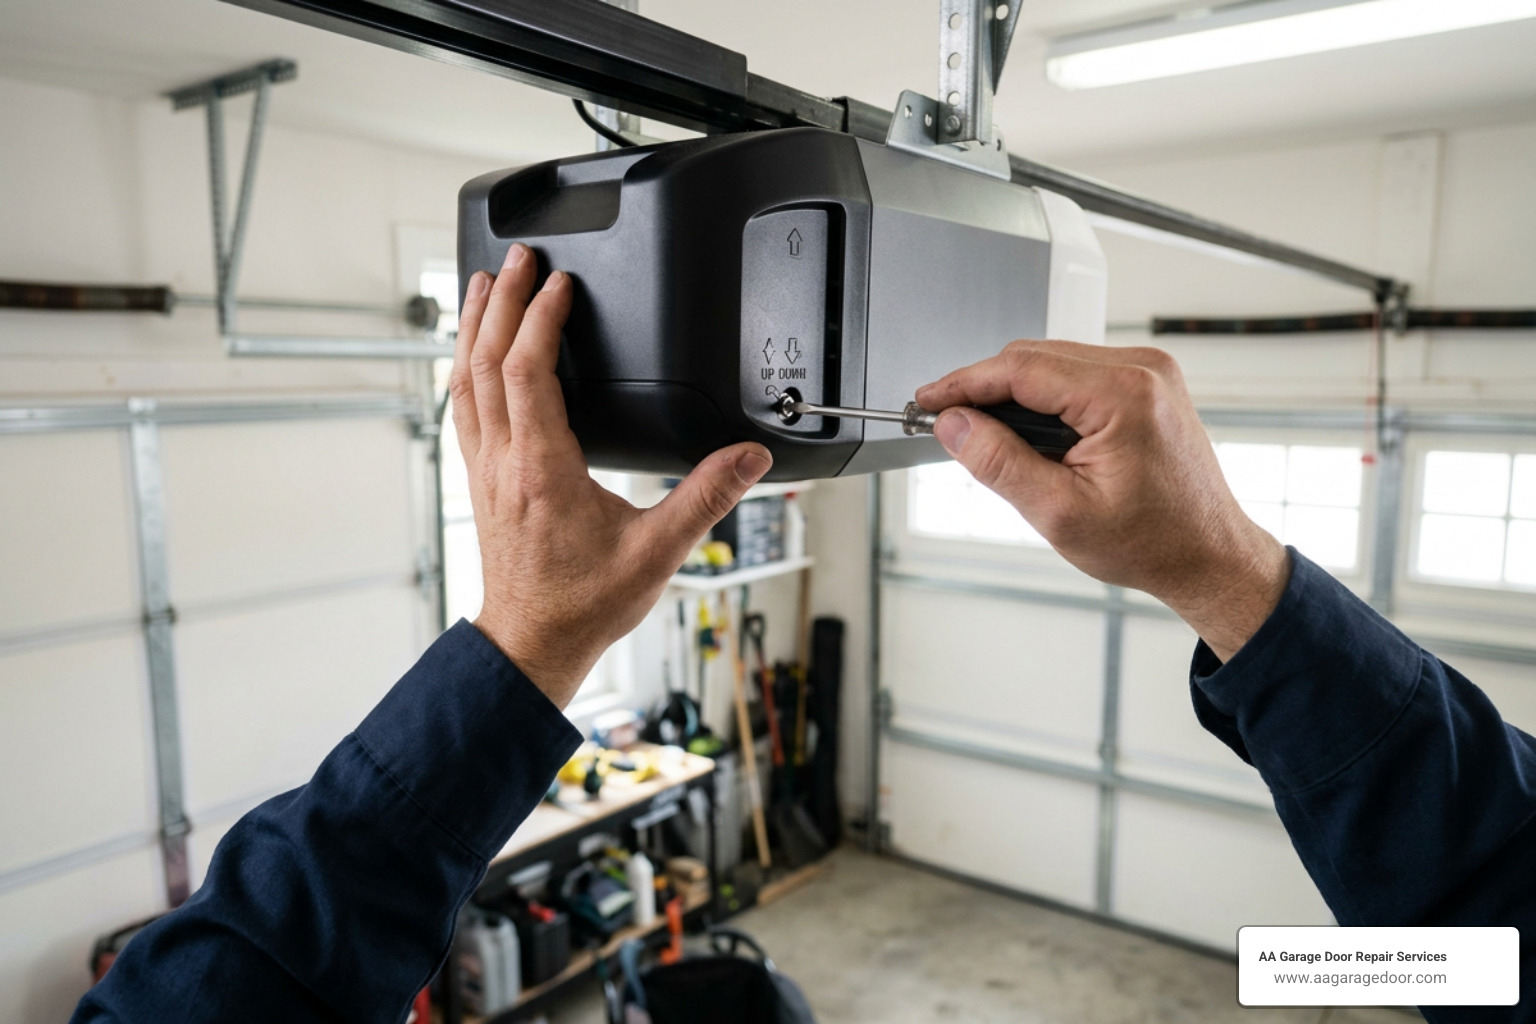
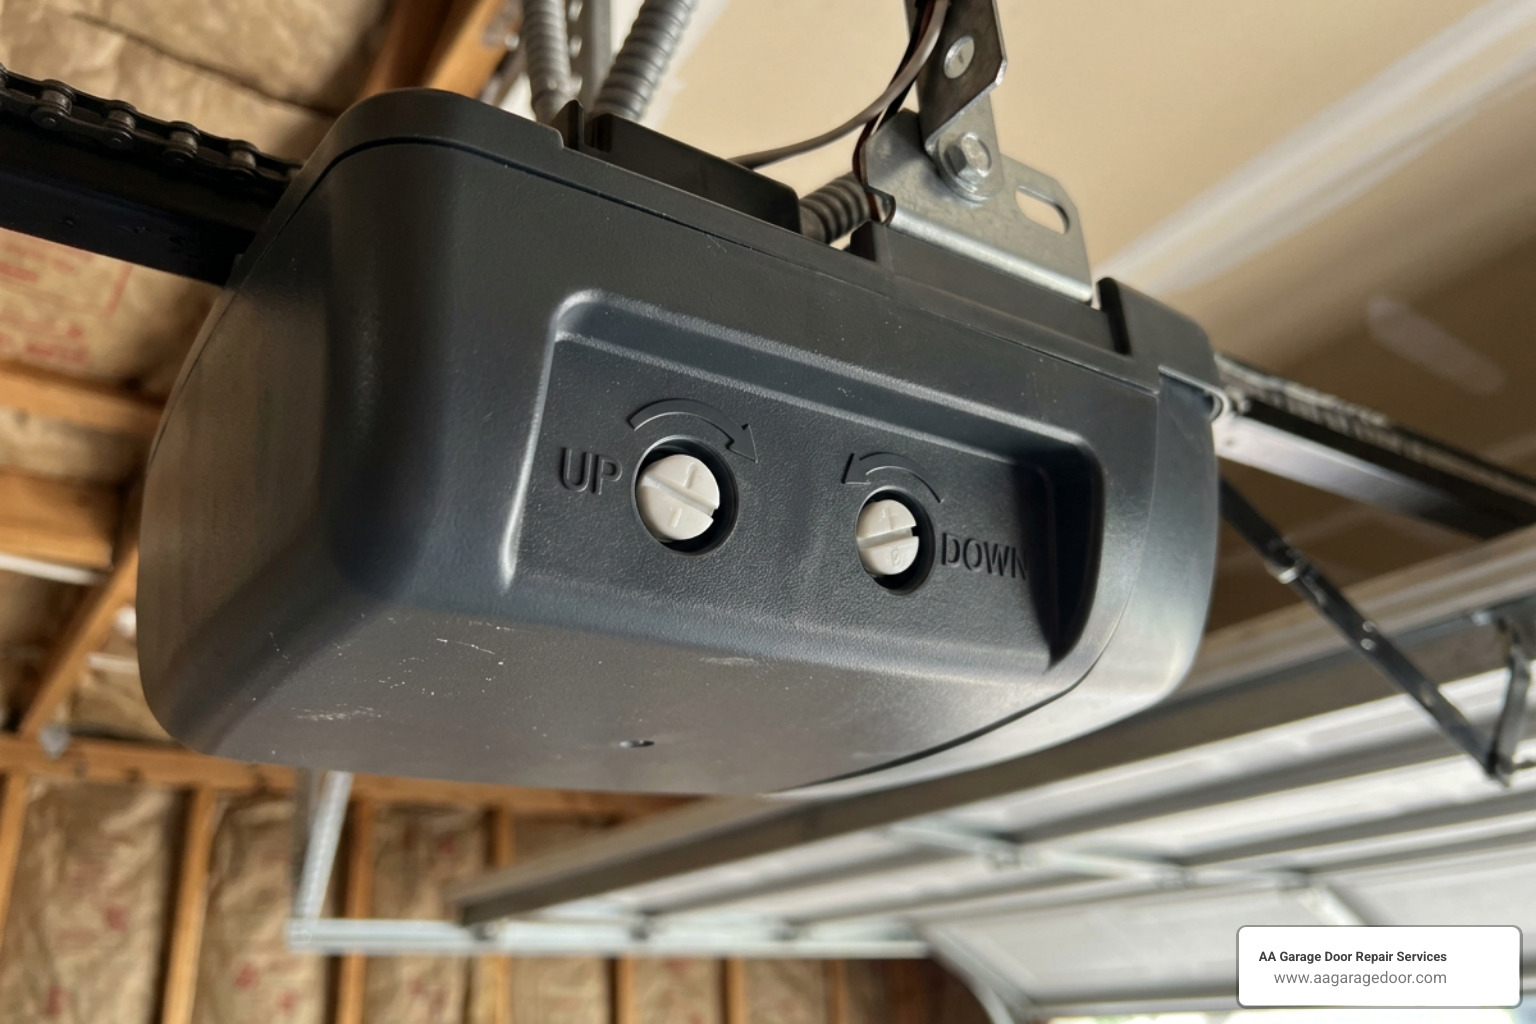
If your opener was manufactured before 2011, it likely features two plastic screw dials on the side or back of the motor unit. These are typically labeled “UP” and “DOWN” (or “OPEN” and “CLOSE”) and may have directional arrows indicating which way to turn them.
On legacy Chamberlain and LiftMaster models, one full turn of the screw equals exactly 2 inches (5 cm) of door travel. On older Genie models, one full turn equals approximately 1.5 inches.
Follow these steps to adjust manual limit screws:
- Observe the current stopping point: Run the door through a full cycle. Note exactly how far off the door is from its ideal stopping point.
- Locate the screws: Place a sturdy ladder under the motor unit and locate the plastic adjustment screws.
- Adjust the DOWN Limit:
- If the door leaves a gap: You need to increase the downward travel. Turn the DOWN limit screw counterclockwise (usually) to make the door travel further down. Start with a half-turn (which equals about 1 inch of travel).
- If the door hits the floor and reverses: You need to decrease the downward travel. Turn the DOWN limit screw clockwise to shorten the travel.
- Adjust the UP Limit:
- If the door doesn’t open fully: Turn the UP limit screw clockwise to increase upward travel. Ensure the bottom of the door is even with the header, but stop the carriage at least 1 to 2 inches short of the physical stop bolt on the rail to prevent damage.
- If the door opens too far: Turn the UP limit screw counterclockwise to decrease upward travel.
- Test the door: Run the door through a complete cycle.
- Let it cool down: Continuous testing can trigger the motor’s thermal overload protection. If the motor suddenly stops responding, wait 15 minutes for the thermal protector to cool down before trying again.
For official manufacturer guidelines on manual screws, you can review the How To Adjust The Limit Or Travel On A Garage Door Opener With Manual Adjustment Screws support page.
Programming Modern Digital Openers (Chamberlain, LiftMaster, Genie)
Modern openers manufactured under the Chamberlain, LiftMaster (Security 2.0+), and Genie brands utilize digital push-buttons and LED lights on the motor head to set limits electronically. These systems are highly precise and automatically calibrate their force settings during the limit-setting process.
For Chamberlain and LiftMaster (Security 2.0+):
- Locate the three programming buttons on the back of the opener (usually an UP arrow, a DOWN arrow, and a rectangular middle button).
- Press and hold the middle rectangular button until the UP arrow begins to flash. This indicates the unit is in programming mode.
- Press and hold the UP arrow button until the door reaches your desired fully open position. (Ensure there is at least 1 inch of clearance between the trolley and the physical stop bolt on the rail).
- Press the middle rectangular button once. The garage door opener lights will flash, and the DOWN arrow will begin to blink, saving your UP limit.
- Press and hold the DOWN arrow button until the door is fully closed and the bottom weather seal is slightly compressed against the floor. Do not compress it so much that the door panel buckles.
- Press the middle rectangular button once. The opener lights will flash, saving your DOWN limit.
- The opener will now automatically run a complete cycle to learn and set its force limits. Stand clear of the door while this occurs.
For Genie Openers (including Genie Excelerator):
- Press and hold the Program/Set button (a round button or a square button with an LED next to it) until the long LED turns blue. Release the button; the round LED will blink blue.
- Press and hold the UP arrow button until the door is fully open. Release.
- Press and release the Program/Set button. Both LEDs will flash blue, confirming the UP limit is saved.
- Press and hold the DOWN arrow button until the door is fully closed with the weather seal touching the floor.
- Press and release the Program/Set button. Both LEDs will flash blue, saving the DOWN limit.
- Crucial Time Limit: Genie programming has a strict 30-second time limit per step. If you take longer than 30 seconds, both LEDs will illuminate red, and you must restart the process from step 1.
- Disconnect any battery backup systems before programming; Genie limits must be set while running on AC power.
For detailed model-specific instructions on Genie Excelerator units, see the Genie Excelerator Garage Door Opener Limit Switch Adjustment Guide.
Post-Adjustment Safety Testing and Troubleshooting
Any time you adjust your travel limits or force settings, you must perform a safety reversal test. This is not optional—it is a critical safety measure to protect your family and vehicles.
The 2×4 Safety Reversal Test (Mechanical Auto-Reverse)
- Open your garage door completely.
- Place a standard 2×4 piece of wood flat on the garage floor, directly in the center of the door’s path. (A flat 2×4 is exactly 1.5 inches thick).
- Press the wall button or remote to close the door.
- The door must travel down, strike the wood block, and immediately reverse to the fully open position.
- If the door stops on the block but does not reverse, your down travel limit is set too short (the opener thinks it hasn’t reached the floor yet and stops), or your close force is set too light. Increase the down travel slightly and test again.
- If the door refuses to reverse after multiple adjustments, disconnect the opener and call a professional technician immediately.
Common Mistakes to Avoid During Adjustment
- Making Adjustments Too Large: Turning a manual screw three or four full rotations at once can cause the door to crash into the floor or header, damaging the trolley, stripping the gears, or throwing the cables off the drums. Always adjust in quarter-turn increments.
- Adjusting Force to Fix Limit Issues: If your door reverses because the down limit is set too far, raising the force setting to bypass the reversal will only strain the motor and create a safety hazard.
- Ignoring Door Balance: A door that is heavy, binding, or has a broken spring cannot be fixed by adjusting the limits. Pull the emergency release cord and lift the door manually. It should open smoothly and stay in place at waist height. If it slams shut or feels incredibly heavy, your springs are unbalanced—do not attempt to adjust the limits.
- Not Disconnecting Remotes: Keep remotes out of reach of children or family members while you are on a ladder adjusting the unit to prevent accidental activation.
Frequently Asked Questions about Garage Door Limit Adjustment
Why does my garage door reverse immediately after touching the floor?
This is the single most common symptom of an over-extended down limit. When the down travel limit is set too far, the door reaches the concrete floor before the opener’s internal counter registers that it has completed its run.
Because the motor is still trying to push downward, it encounters the hard resistance of the concrete. The opener’s logic board registers this sudden resistance as a physical obstruction (like a car bumper or a child) and triggers the auto-reversal safety system to prevent crushing.
To fix this, turn your DOWN limit screw clockwise (usually 1 to 2 quarter-turns) to decrease the downward travel distance, or reprogram your digital down limit so the door stops slightly higher.
How do I reset travel limits after pulling the emergency release cord?
If you pulled the red emergency release cord and your opener is now “lost,” follow these steps to realign the system:
- Manually close your garage door completely.
- Pull the emergency release handle straight back toward the motor unit to lock the trolley release lever into the “engage” position.
- Manually lift the door until you hear a loud click, indicating the outer trolley has re-engaged with the inner trolley of the opener chain or belt.
- Press your wall button. The opener should run, and because you reconnected the door in the fully closed position, the internal position memory should match the door’s physical location.
- If the door still stops short or reverses, you will need to run a complete digital or manual limit recalibration sequence.
How often should I adjust my garage door travel limits?
Under normal conditions, you should not have to adjust your travel limits frequently. However, due to the extreme seasonal temperature shifts in Minnesota and Western Wisconsin, we recommend performing a quick check of your door’s seal and safety reversal system twice a year: once in late autumn (before the ground freezes) and once in late spring (after the thaw).
Conclusion
A properly calibrated garage door opener is the key to keeping your home secure, insulated, and safe. While minor limit tweaks are a straightforward DIY task, persistent issues—such as grinding noises, a door that feels heavy to lift manually, or an opener that refuses to save its digital limits—point to deeper mechanical problems.
Adjusting limits on a door with broken springs, frayed cables, or warped tracks can cause catastrophic damage to your opener motor and structural tracks. If your door continues to bind, reverse, or fail its safety tests, do not risk your safety.
At AA Garage Door Repair Services, we have been providing fast, reliable, and transparent garage door solutions across St. Paul, the Twin Cities, and Western Wisconsin since 2001. We offer 24/7 emergency services to ensure your home remains secure no matter the weather.
For professional calibration, track alignment, or a complete door safety inspection, contact our local experts today.
- Schedule Online: AA Garage Door Maintenance Services