Why You Should Update Your Garage Door PIN Regularly
Most homeowners treat their garage door keypad like a “set-it-and-forget-it” appliance. However, keeping the same PIN for years poses a significant security risk. If you want to ensure your home remains secure, investing in professional garage door services is a great first step. According to scientific research on garage security, regularly changing your garage door code can reduce security breaches by up to 40%.
When you share your code with dog walkers, contractors, or neighbors, your home’s perimeter becomes increasingly compromised. Over time, physical keypads also show wear; frequently pressed buttons can become dirty, worn down, or discolored, making it incredibly easy for an intruder to guess your four-digit combination.
Fortunately, modern garage door openers rely on rolling code technology. Instead of sending the exact same radio frequency signal every time, systems like Chamberlain’s Security+ 2.0 generate a brand-new encrypted signal after each button press. This prevents tech-savvy criminals from using “code grabbers” to intercept your signal.
To maintain maximum protection, we recommend updating your code every three to six months. If you want to learn more about keeping your system safe, you can read our detailed guide on changing the garage door opener code.
How Do I Change Garage Door Code? The 3 Best Methods
When homeowners ask how do I change garage door code, they are often surprised to learn that there isn’t just one universal programming method. The correct process depends entirely on the age, brand, and technology of your opener.

Before you begin, you need to identify which technology your garage door opener uses. There are three primary methods to change your code:
- The Learn Button Method: Used for modern openers (manufactured after 1993) with rolling code technology.
- The Keypad-Only Method: Used to update a PIN directly on the keypad when you already know the existing code.
- The DIP Switch Method: Used for vintage openers (manufactured before 1993) that rely on physical, manual switches.
If you are dealing with an older or universal system and need specific instructions, check out our universal keypad resets resource.
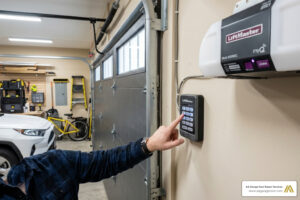
Method 1: How Do I Change Garage Door Code Using the Learn Button?
The Learn button method is the most reliable way to reset your system because it programs the new PIN directly into the overhead motor unit. This is highly recommended if you have recently moved into a new home in Woodbury, MN, or Baldwin, WI, as it completely clears out any old, forgotten codes.
Follow these steps to reprogram your opener using the Learn button:
- Set Up a Safe Ladder: Position a sturdy step ladder underneath your overhead motor unit. Ensure you have clear overhead clearance.
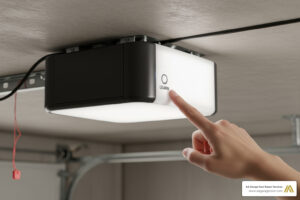
- Locate the Learn Button: Remove the light cover on the opener motor. The Learn button is usually a brightly colored button (yellow, purple, red, orange, or green) located on the back or side panel.
- Clear Old Codes (Optional but Recommended): Press and hold the Learn button for approximately 6 to 10 seconds. The indicator light next to the button will glow and then turn off. Once it turns off, all previous keypad PINs and remote controls are erased from the memory.
- Activate Programming Mode: Press and quickly release the Learn button. Do not hold it down this time. The indicator light will glow steadily for 30 seconds. This is your programming window.
- Enter the New Code: Within that 30-second window, walk to your exterior wireless keypad. Enter your new 4-digit PIN.
- Confirm and Sync: Press and hold the Enter or Send button on the keypad. Hold it until you see the overhead light bulb on the motor unit flash twice, or until you hear two audible clicks.
- Test the Code: Wait a few seconds, then type in your new PIN and press Enter. The garage door should open or close smoothly.
If you need to sync your handheld remotes after this process, check our comprehensive guide on reprogramming a garage door opener.
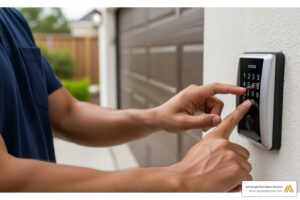
Method 2: How Do I Change Garage Door Code on a Keypad Without the Learn Button?
If your keypad is already synced to your opener and you simply want to update your PIN for routine security, you often do not need to climb a ladder. Many wireless keypads allow you to change the PIN directly on the keypad if you know the existing code.
This method works incredibly well on Chamberlain and LiftMaster keyless entry systems. To update your code using only the keypad, follow these steps:
- Enter your existing 4-digit PIN on the keypad.
- Press and hold the # (pound) button. The indicator light on the opener unit will flash twice. Release the button.
- Enter your new 4-digit PIN.
- Press and hold the Enter button. The light bulb on the overhead opener unit will flash once or click to confirm the change.
- Test the new code to ensure the door responds.
For more brand-specific keypad steps, you can read more about Chamberlain keypad programming.
Method 3: Resetting Older DIP Switch Systems
If your home in Hudson, WI, features an older garage door opener manufactured before 1993, your system does not have a Learn button. Instead, these vintage systems use physical DIP switches to establish a secure radio frequency connection.

DIP switches are tiny, sliding plastic switches that can be set to “+”, “-“, or “0” positions. Because these codes are static, they do not change automatically, making them highly vulnerable to code-grabbing devices.
To change the code on a DIP switch system:
- Disconnect the Power: Unplug the overhead garage door opener from the ceiling outlet to avoid accidental activation.
- Open the Remote and Opener: Use a flathead screwdriver to open the battery compartment of your handheld remote. Next, open the physical cover on your overhead receiver unit.
- Locate the Switches: You will see a row of 8 to 12 tiny switches inside both the remote and the opener.
- Match the Switch Patterns: Slide the switches into a brand-new, random pattern. Crucial Step: The switch pattern inside your remote control must match the switch pattern inside the overhead motor unit exactly.
- Update the Keypad: If you have an older wired or wireless keypad, open its casing and match its internal DIP switches to the exact same sequence.
- Restore Power and Test: Plug the opener back in and test the remote and keypad to ensure they actuate the door.
If you are trying to program a universal keypad to an older system, refer to our universal codes guide for step-by-step DIP switch mapping.
Brand-Specific Programming Steps and Learn Button Colors
The color of your opener’s Learn button tells you the exact radio frequency your system uses. Knowing this color is essential when matching replacement keypads or troubleshooting a failed programming attempt.
| Brand | Learn Button Color | Radio Frequency | Key Programming Step |
|---|---|---|---|
| Chamberlain / LiftMaster | Yellow | 310 MHz (Security+ 2.0) | Press Learn once; enter PIN + Enter within 30 seconds. |
| Chamberlain / LiftMaster | Purple | 315 MHz (Security+ 3.0) | Press Learn once; hold Enter on keypad until lights flash. |
| Chamberlain / LiftMaster | Orange / Red | 390 MHz (Security+) | Press Learn once; enter PIN + Enter within 30 seconds. |
| Genie / Overhead Door | Black / Gray / Red | 315/390 MHz (Intellicode) | Hold Program button until LED turns blue, then enter PIN + Up/Down. |
| Craftsman | Green | 390 MHz (Billion Code) | Press Learn button; enter PIN + Enter on keypad. |
If you are using a universal keypad and want to make sure it is fully compatible with your specific Learn button color, check out our garage door keypad complete guide.
Troubleshooting Common Keypad Programming Issues
Sometimes, despite following every step perfectly, your wireless keypad refuses to save the new code. If you find yourself locked out, run through this quick troubleshooting checklist:
- Replace the Keypad Battery: Over 80% of keypad failures are caused by weak batteries. A keypad might have enough power to light up its backlighting, but not enough power to transmit a strong radio frequency signal to the overhead receiver. Always install a fresh, high-quality 9V battery before programming.
- Clear the Opener Memory: If your overhead motor unit has reached its maximum memory limit (usually 5 to 10 remotes/keypads), it will reject new codes. Hold down the Learn button for 10 seconds to wipe the memory clean, then program your devices one by one.
- Check for Radio Frequency (RF) Interference: LED light bulbs installed inside your garage door opener can emit electromagnetic interference that blocks keypad signals. Temporarily unscrew your garage light bulbs and try programming the keypad again.
- Get Closer to the Receiver: If your keypad is mounted on a brick or stucco wall, the signal may be blocked. Try holding the keypad in your hand directly underneath the motor unit while programming, then mount it back on the wall once synced.

If your keypad remains unresponsive even after replacing the battery and clearing the memory, you may be dealing with a failing logic board or damaged wiring. Learn more about maintaining your system in our garage door maintenance complete guide.
Frequently Asked Questions About Changing Garage Door Codes
How often should I change my garage door code?
We highly recommend updating your garage door code at least once a year as part of your routine home maintenance. However, you should change it immediately if you have recently moved into a new home, if you suspect someone has unauthorized access, or if you have shared your PIN with contractors, realtors, or temporary guests.
Can I change my garage door code from my phone?
Yes! Over 70% of residential garages in North America now rely on smart opener systems. If you have a Chamberlain or LiftMaster opener with myQ technology, or a Genie opener with Aladdin Connect, you can manage access codes directly through their respective mobile apps. These apps allow you to create temporary guest PINs, monitor access logs, and delete codes instantly without ever touching a physical keypad.
What should I do if my keypad won’t accept the new code?
If your keypad won’t accept the new PIN, start by clearing the opener’s memory by holding down the Learn button for 10 seconds. Replace the keypad’s 9V battery, and ensure there are no active LED bulbs in the opener causing signal interference. If the issue persists, the keypad itself or your opener’s internal logic board may need professional replacement.
Secure Your Home with the Twin Cities’ Garage Door Experts
Changing your garage door code is a quick, high-impact DIY project that instantly boosts your home’s security. However, if your keypad remains completely unresponsive, your overhead motor is making strange noises, or you would prefer a professional technician to handle your home’s security upgrade, we are here to help.
At AA Garage Door Repair Services, we have provided top-tier garage door installations, repairs, and maintenance across St. Paul, Woodbury, Hudson, and Baldwin since 2001. We offer fast, reliable 24/7 emergency services, transparent pricing, and a complete satisfaction guarantee.
Don’t leave your home’s primary entryway vulnerable to outdated codes. You can call us at (651) 702-1420 or schedule professional garage door opener services online to get your system running perfectly.